
This repository provides DevOps practices necessary to develop applications based on Amazon Elastic Container Service(ECS) container. Various AWS services are used to support DevOps best practices such as MSA, IaC, CICD, Monitoring and Configuration Management. All necessary cloud resources are modeled and deployed through AWS Cloud Development Kit(CDK). Because AWS CDK abstracts AWS cloud resources as much as possible, we can use it to accelerate DevOps.
This sample suports both CDK Ver1 and CDK Ver2.
- AWS CDK Version1 branch: release_cdk_v1
- AWS CDK Version2 branch: release_cdk_v2
The basic structure of this CDK project is derived from the following project. Refer to the repository how to design CDK application and orgnize CDK project.
Korean guide here:
- Korean
Hands on LabGuide: AWS-Builders-AWS-CDK-HoL-20220623.pdf - Korean
SessionVideo: youtube AWS DevOps with CDK
Other “Using AWS CDK” series can be found at:
- AWS Serverless Using AWS CDK
- Amazon SageMaker Model Serving Using AWS CDK
- AWS IoT Greengrass Ver2 using AWS CDK
- Amazon SageMaker Built-in Algorithms MLOps Pipeline Using AWS CDK
DevOps encourages various practices to increase development productivity and speed deployment. Representative practies are:
- MSA(Micro-service Architecture) as a architecture style
- IaC(Infrastructure as Code) as a way to deal with infrastructure
- CICD(Continuous Integration Continuous Deploy) Pipeline as a SCM & deployment automation
- Monitoring Dashboard as a status/usage monitoring
- Configuration Management for maintaining a strict separation of configuration from code
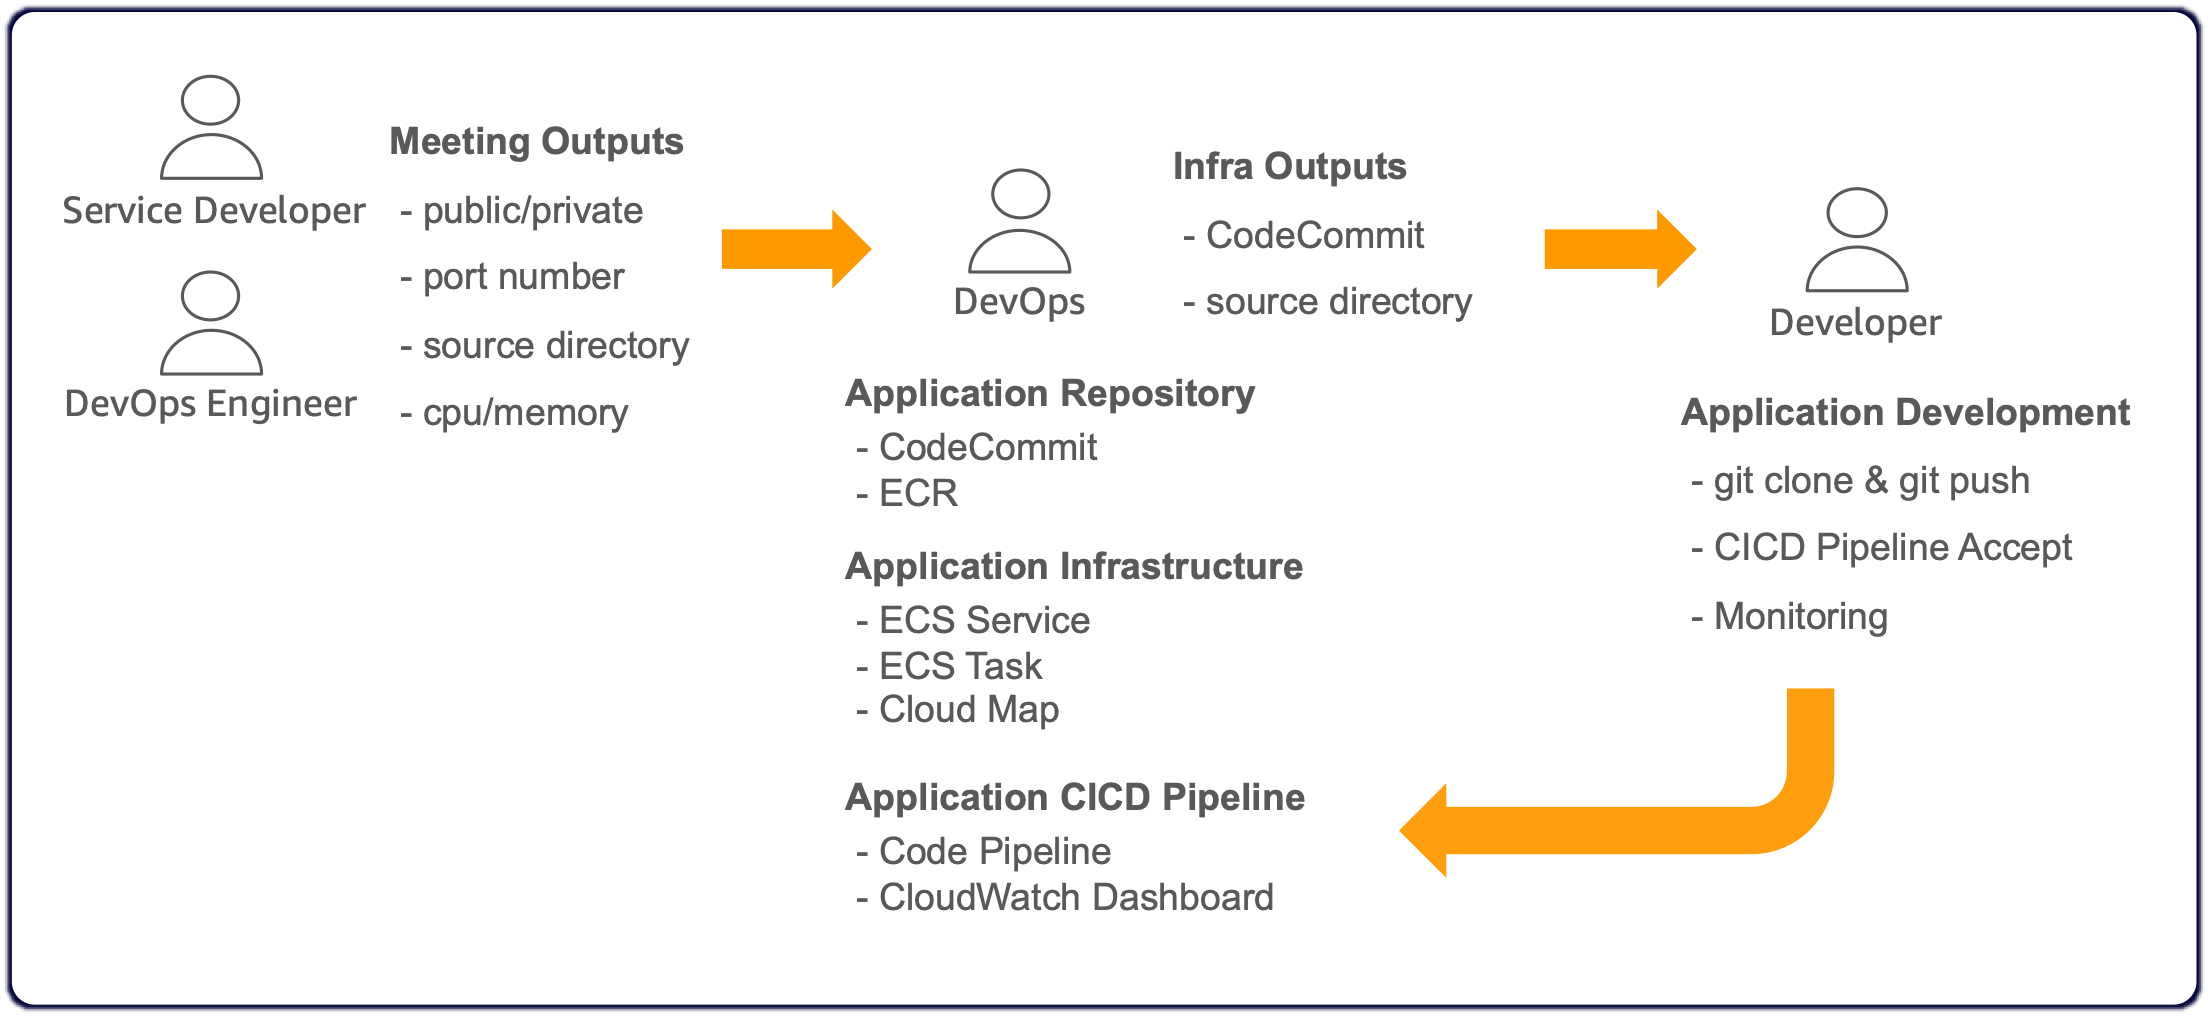
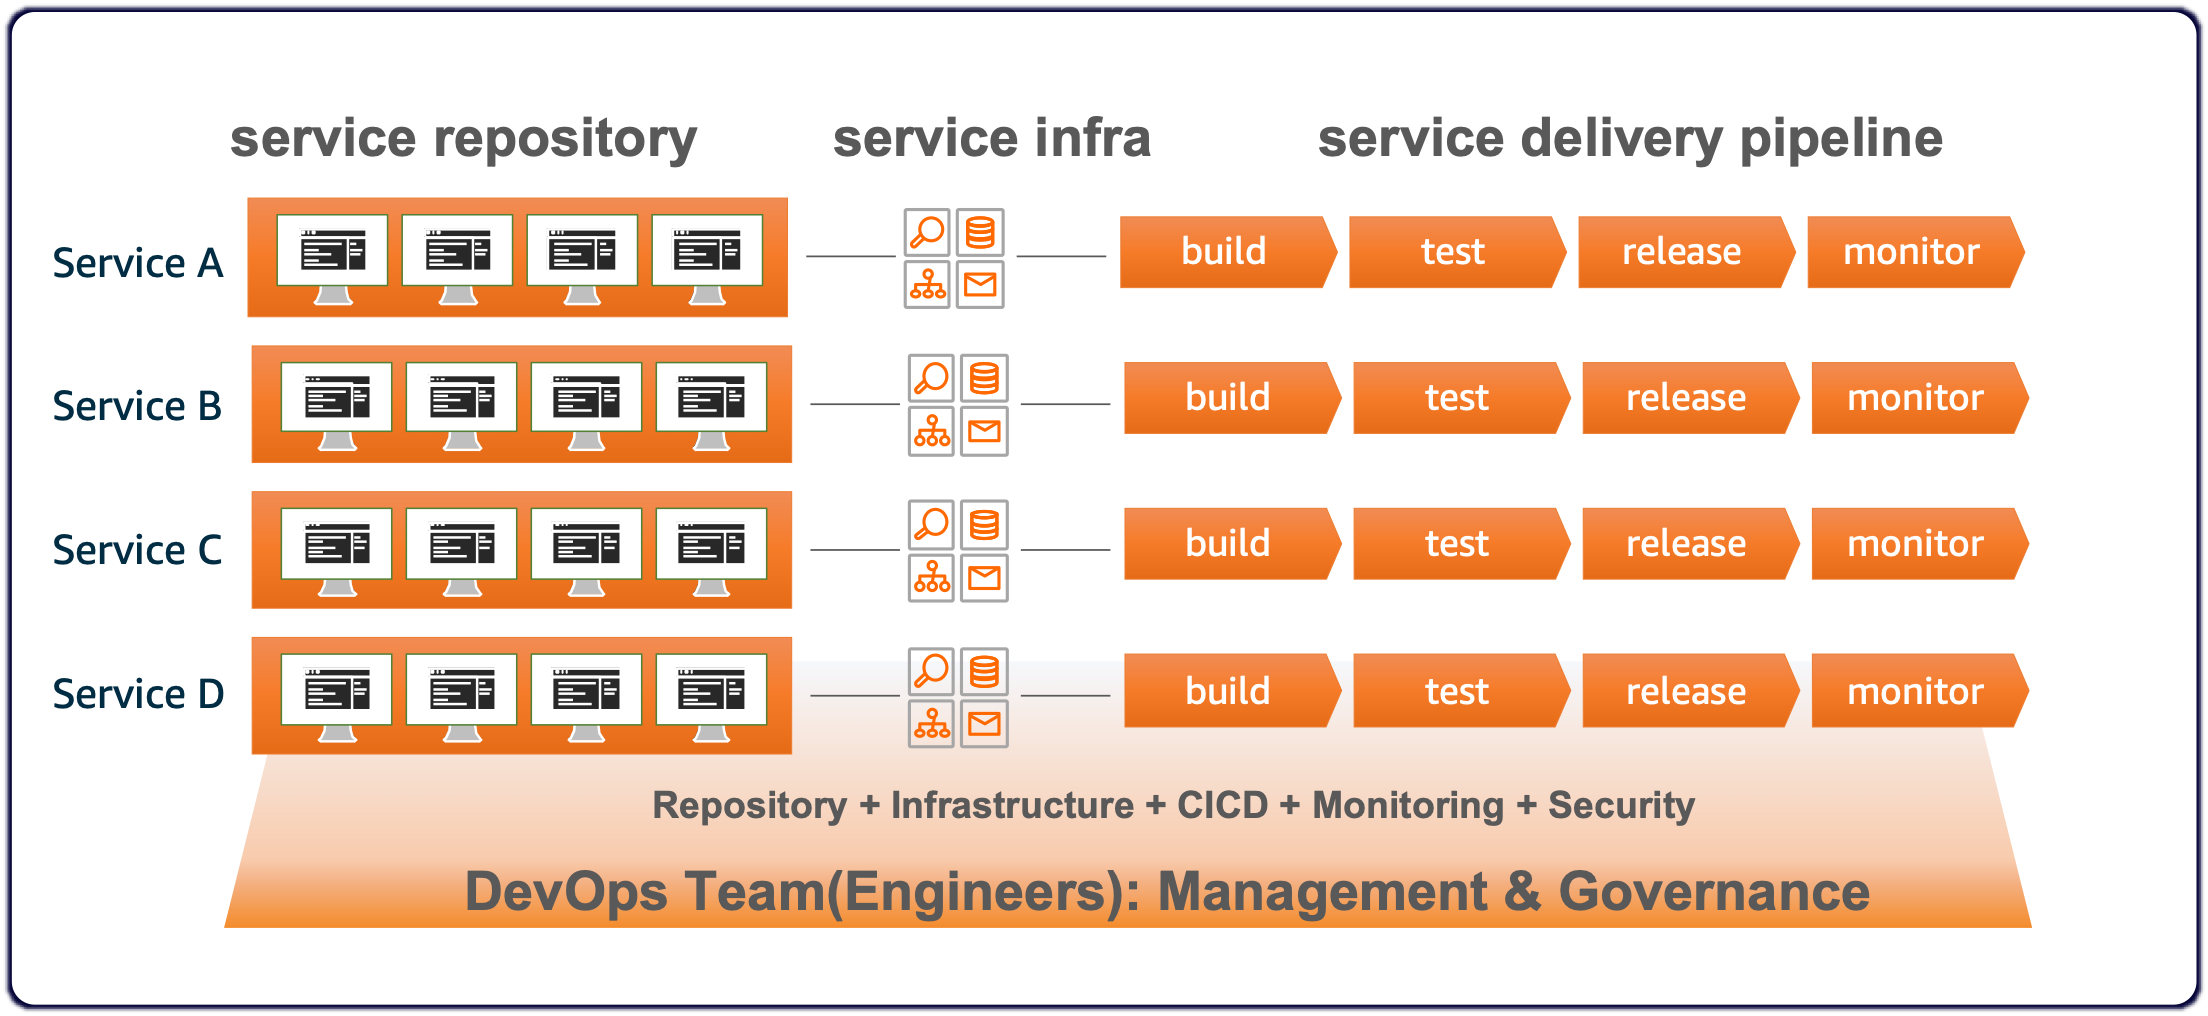
A small number of DevOps team(engineers) should be able to provide the following environments(tool/service/infra) easily and quickly and scalably to each service team. At the same time, they must have ownership of the common areas and resources of each service. Conversely, service team(developers) should be able to focus on developing business logic.
After they(DevOps engineer & Service developer) hold a new service development meeting, DevOps team configures the entire environment(tool/service/infra) and delivers the service development project’s Git repository to the service development team, where the service development team develops business logic. Ultimately, they tune cloud resources through monitoring together.

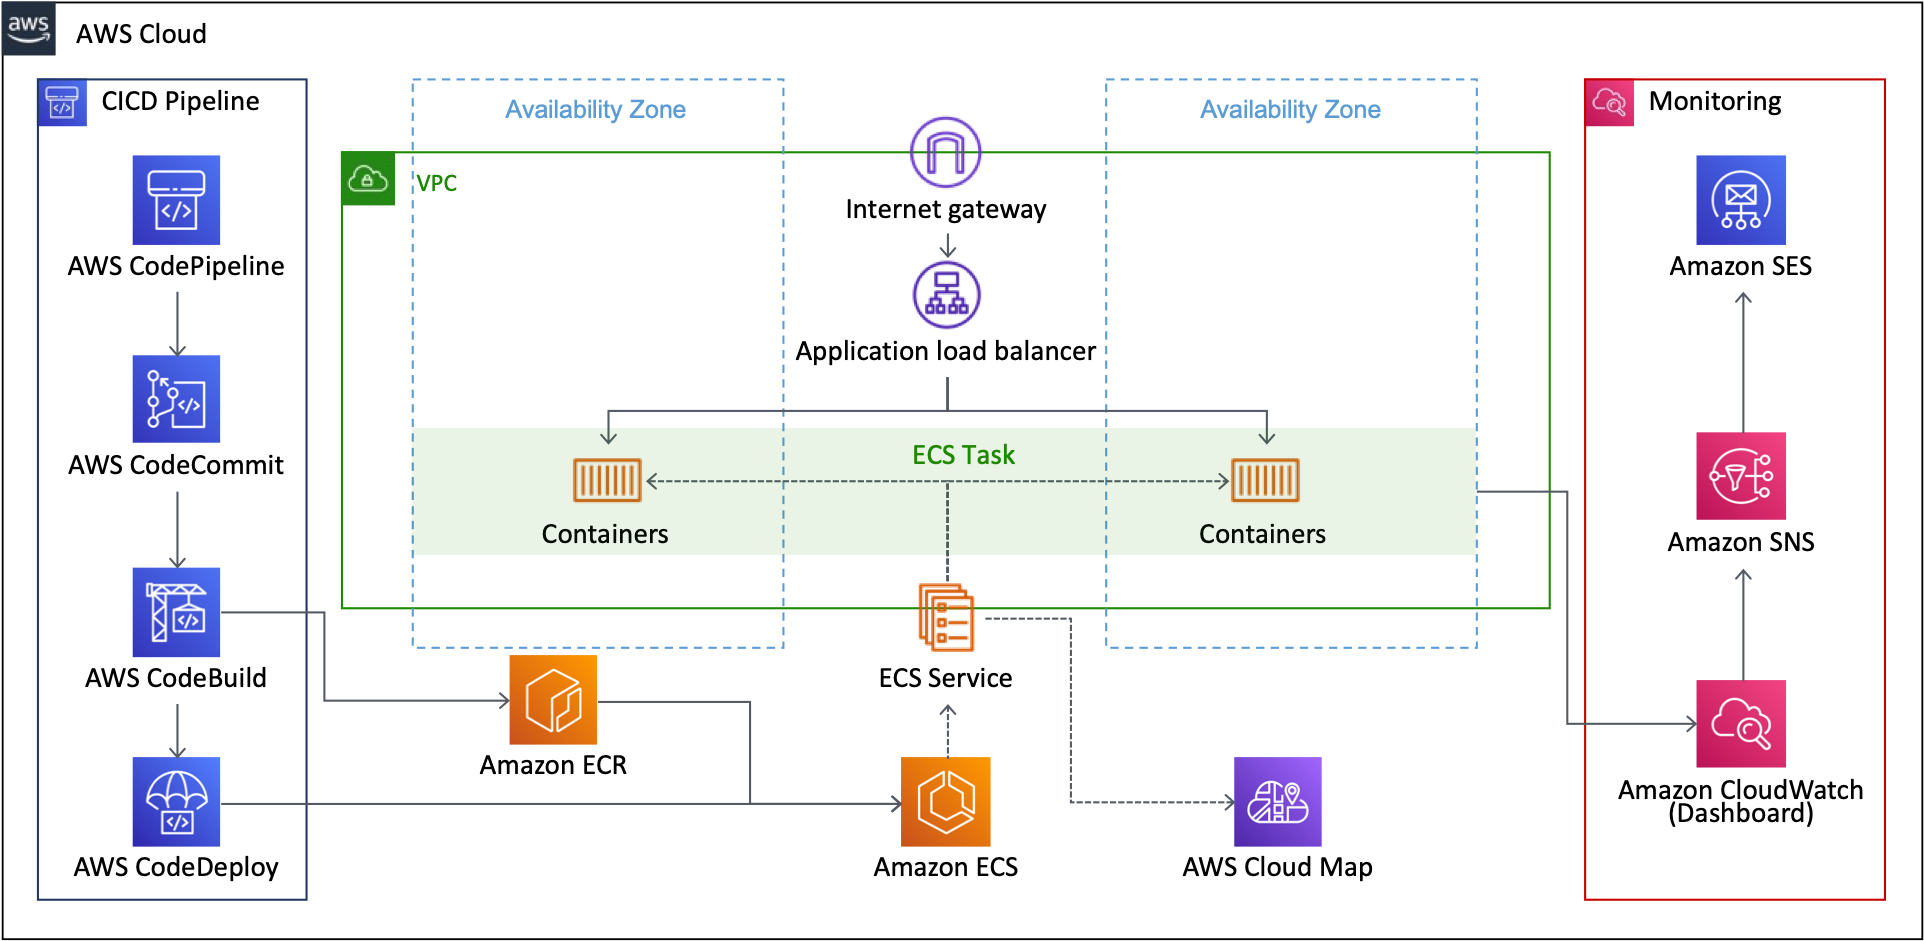
These are the essential elements that each micro-service development team must have for MSA. This repository abstracts these functions through programmable CDK and provides them through CloudFormation/CDK Stack. In other words, CDK serves as a tool to make the most of these best practices.

- Container-based MSA: each micro-services are implemented using AWS ECS(Cluster/Service/Task)
- Programming-based IaC: all cloud resources are modeld and provisioned using AWS CDK(Typescript)
- Fully managed CICD: Continuous integration and continuous deploy using AWS Code Series(Pipeline/Commit/Build/Deploy)
- Fully managed Monitoring: logging, metric, dashboard using Amazon CloudWatch
- Service Discovery: private DNS service registration & discovery using AWS Cloud Map

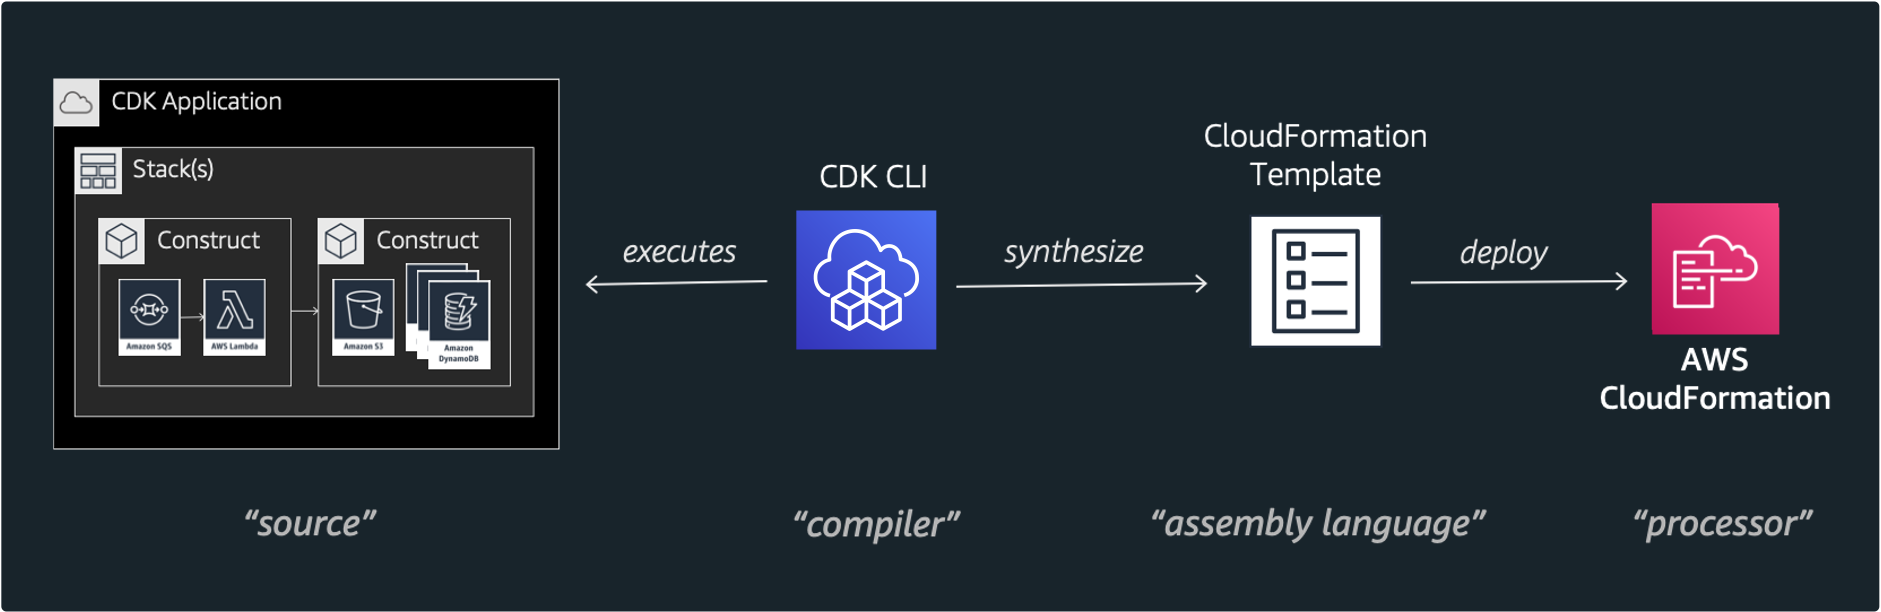
To efficiently define and provision AWS cloud resources, AWS Cloud Development Kit(CDK) which is an open source software development framework to define your cloud application resources using familiar programming languages is utilized.

Because this solusion is implemented in CDK, we can deploy these cloud resources using CDK CLI. Among the various languages supported, this solution used typescript. Because the types of typescript are very strict, with the help of auto-completion, typescript offers a very nice combination with AWS CDK.
npm installinstall dependenciescdk listlist up stackscdk deploydeploy this stack to your default AWS account/regioncdk diffcompare deployed stack with current statecdk synthemits the synthesized CloudFormation template
First of all, AWS Account and IAM User is required. And then the following modules must be installed.
- AWS CLI: aws configure –profile [profile name]
- Node.js: node –version
- AWS CDK: cdk –version
- jq: jq –version
Please refer to the kind guide in CDK Workshop.
Please configure your AWS credential to grant AWS roles to your develop PC.
aws configure --profile [your-profile]
AWS Access Key ID [None]: xxxxxx
AWS Secret Access Key [None]:yyyyyyyyyyyyyyyyyyyyyyyyyyyyyy
Default region name [None]: ap-southeast-1
Default output format [None]: json
...
...
If you don’t know your AWS account information, execute the following commad:
aws sts get-caller-identity --profile [your-profile]
...
...
{
    "UserId": ".............",
    "Account": "75157*******",
    "Arn": "arn:aws:iam::75157*******:user/[your IAM User ID]"
}The cdk.json file tells CDK Toolkit how to execute your app. Our current entry point for our project is infra/app-main.ts.
The config/app-config-demo.json file describes how to configure deploy condition & stack condition. First of all, change project configurations(Account, Profile are essential) in config/app-config-demo.json.
{
    "Project": {
        "Name": "EcsProject",
        "Stage": "Demo",
        "Account": "75157*******",
        "Region": "ap-southeast-1",
        "Profile": "cdk-demo"
    },
    ...
    ...
}
And then set the path of the configuration file through an environment variable.
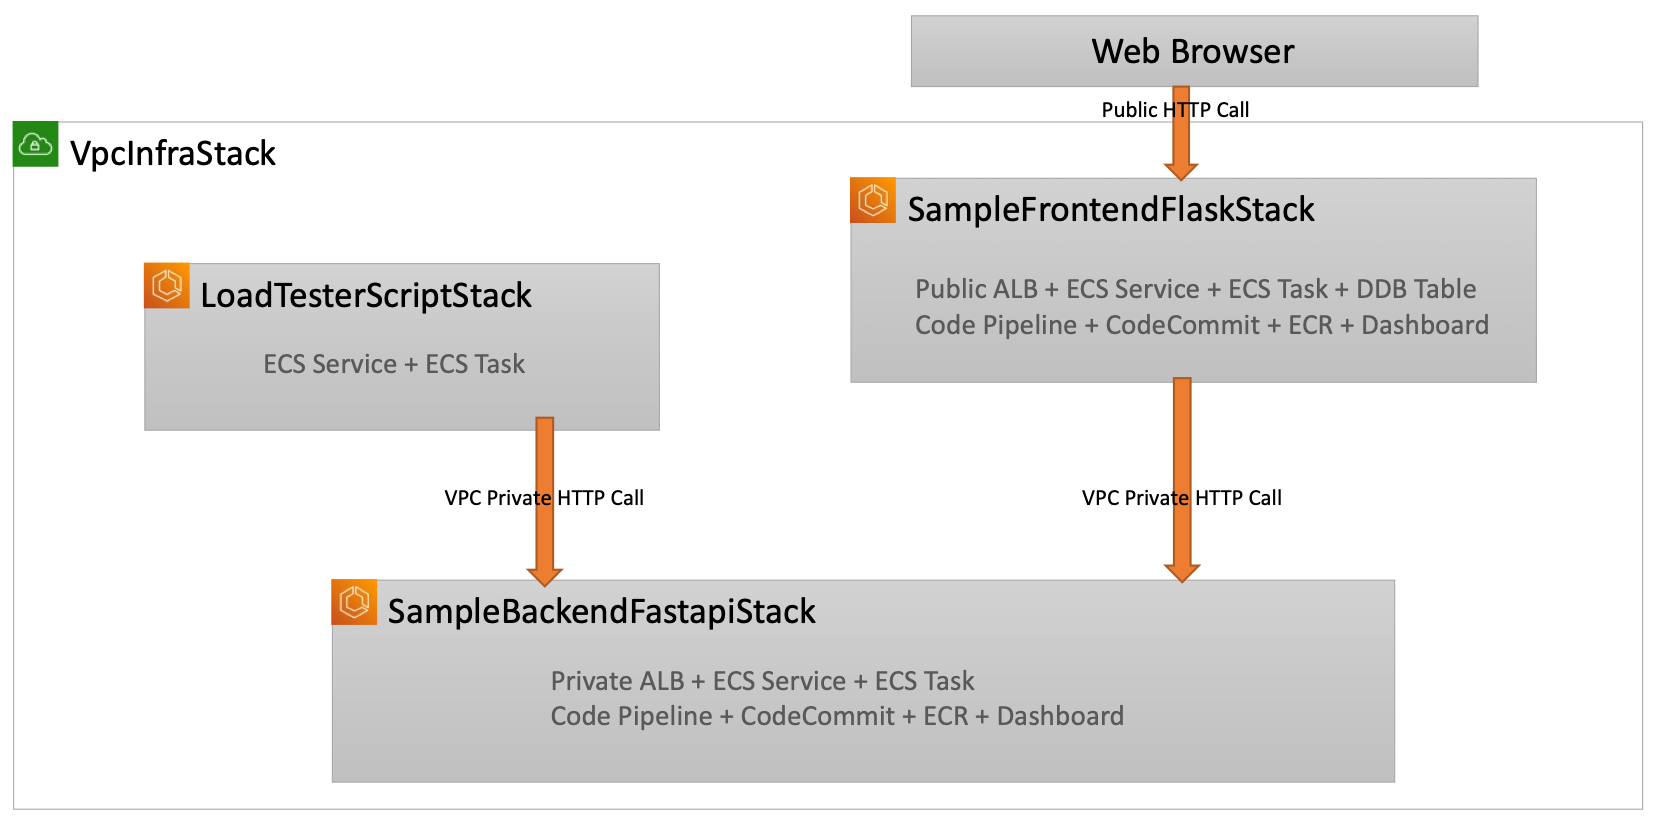
export APP_CONFIG=config/app-config-demo.jsonsh scripts/setup_initial.sh config/app-config-demo.jsonThis project has 4 stacks, each of which does the following:
- EcsProjectDemo-VpcInfraStack: VPC, ECS Cluster, CloudMap Namespace for a base infrastructure
- EcsProjectDemo-SampleBackendFastapiStack: Private ALB, ECS Service/Task, ECR/CodeCommit, DDB Table, CodePipeline/Build, CloudWatch Dashboard for Backend
- EcsProjectDemo-SampleFrontendFlaskStack: Public ALB, ECS Service/Task, ECR/CodeCommit, DDB Table, CodePipeline/Build, CloudWatch Dashboard for Frontend
- EcsProjectDemo-LoadTesterScriptStack: ECS Service/Task for internal-testing

config/app-config-demo.json file describes how to configure each stack. For example backend‘s configuration is like this.
...
...
"SampleBackendFastapi": {
    "Name": "SampleBackendFastapiStack",
    "InfraVersion": "'1.0.0'",
    "DockerImageType": "HUB",
    "DockerImageType-Desc": "HUB or ECR or LOCAL",

    "PortNumber": 80,
    "InternetFacing": false,

    "AppPath": "codes/sample-backend-fastapi",
    "DesiredTasks": 1,
    "Cpu": 256,
    "Memory": 512,

    "AutoScalingEnable": false,
    "AutoScalingMinCapacity": 1,
    "AutoScalingMaxCapacity": 2,
    "AutoScalingTargetInvocation": 50,

    "TableName": "LogTable",

    "AlarmThreshold": 200,
    "SubscriptionEmails": ["kwonyul@amazon.com"]
},
...
...
And frontend‘s configuration is like this.
...
...
"SampleFrontendFlask": {
    "Name": "SampleFrontendFlaskStack",
    "InfraVersion": "'1.0.0'",
    "DockerImageType": "HUB",
    "DockerImageType-Desc": "HUB or ECR or LOCAL",

    "PortNumber": 80,
    "InternetFacing": true,

    "TargetStack": "SampleBackendFastapiStack",

    "AppPath": "codes/sample-frontend-flask",
    "DesiredTasks": 1,
    "Cpu": 256,
    "Memory": 512,

    "AutoScalingEnable": false,
    "AutoScalingMinCapacity": 1,
    "AutoScalingMaxCapacity": 2,
    "AutoScalingTargetInvocation": 50,

    "AlarmThreshold": 200,
    "SubscriptionEmails": ["kwonyul@amazon.com"]
},
...
...
This repository uses python-based containers for convenience only, but you can replace python-based sample stacks with your own container-based stacks later.
Before deployment, check whether all configurations are ready. Please execute the following command:
cdk list
...
...
==> CDK App-Config File is config/app-config-demo.json, which is from Environment-Variable.
EcsProjectDemo-LoadTesterScriptStack
EcsProjectDemo-SampleBackendFastapiStack
EcsProjectDemo-SampleFrontendFlaskStack
EcsProjectDemo-VpcInfraStack
...
...
Check if you can see a list of stacks as shown above.
If there is no problem, finally run the following command:
sh scripts/deploy_stacks.sh config/app-config-demo.jsonCaution: This solution contains not-free tier AWS services. So be careful about the possible costs.
It is typically DevOps engineer’s job to deploy these stacks. After deploying these stacks, DevOps engineers need to pass the repository address(CodeCommit name/address) so that service developers can develop their logic in their repository.
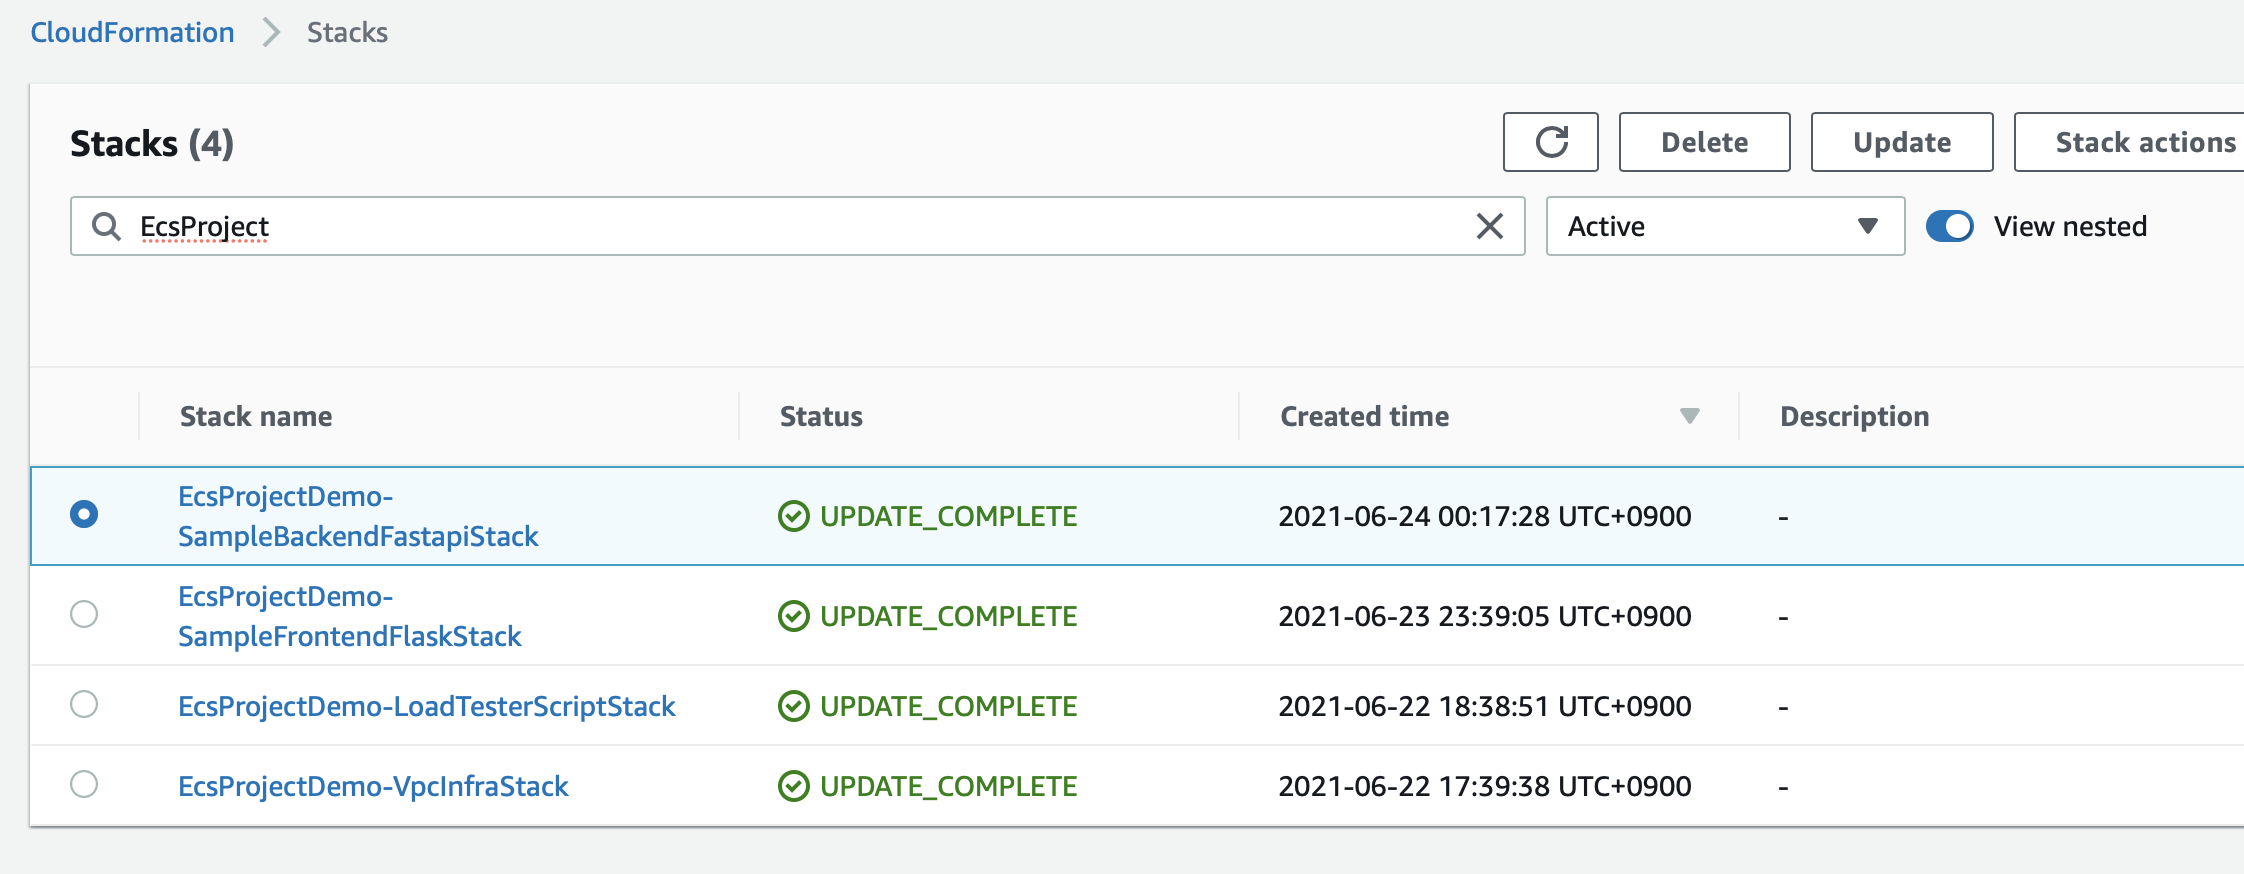
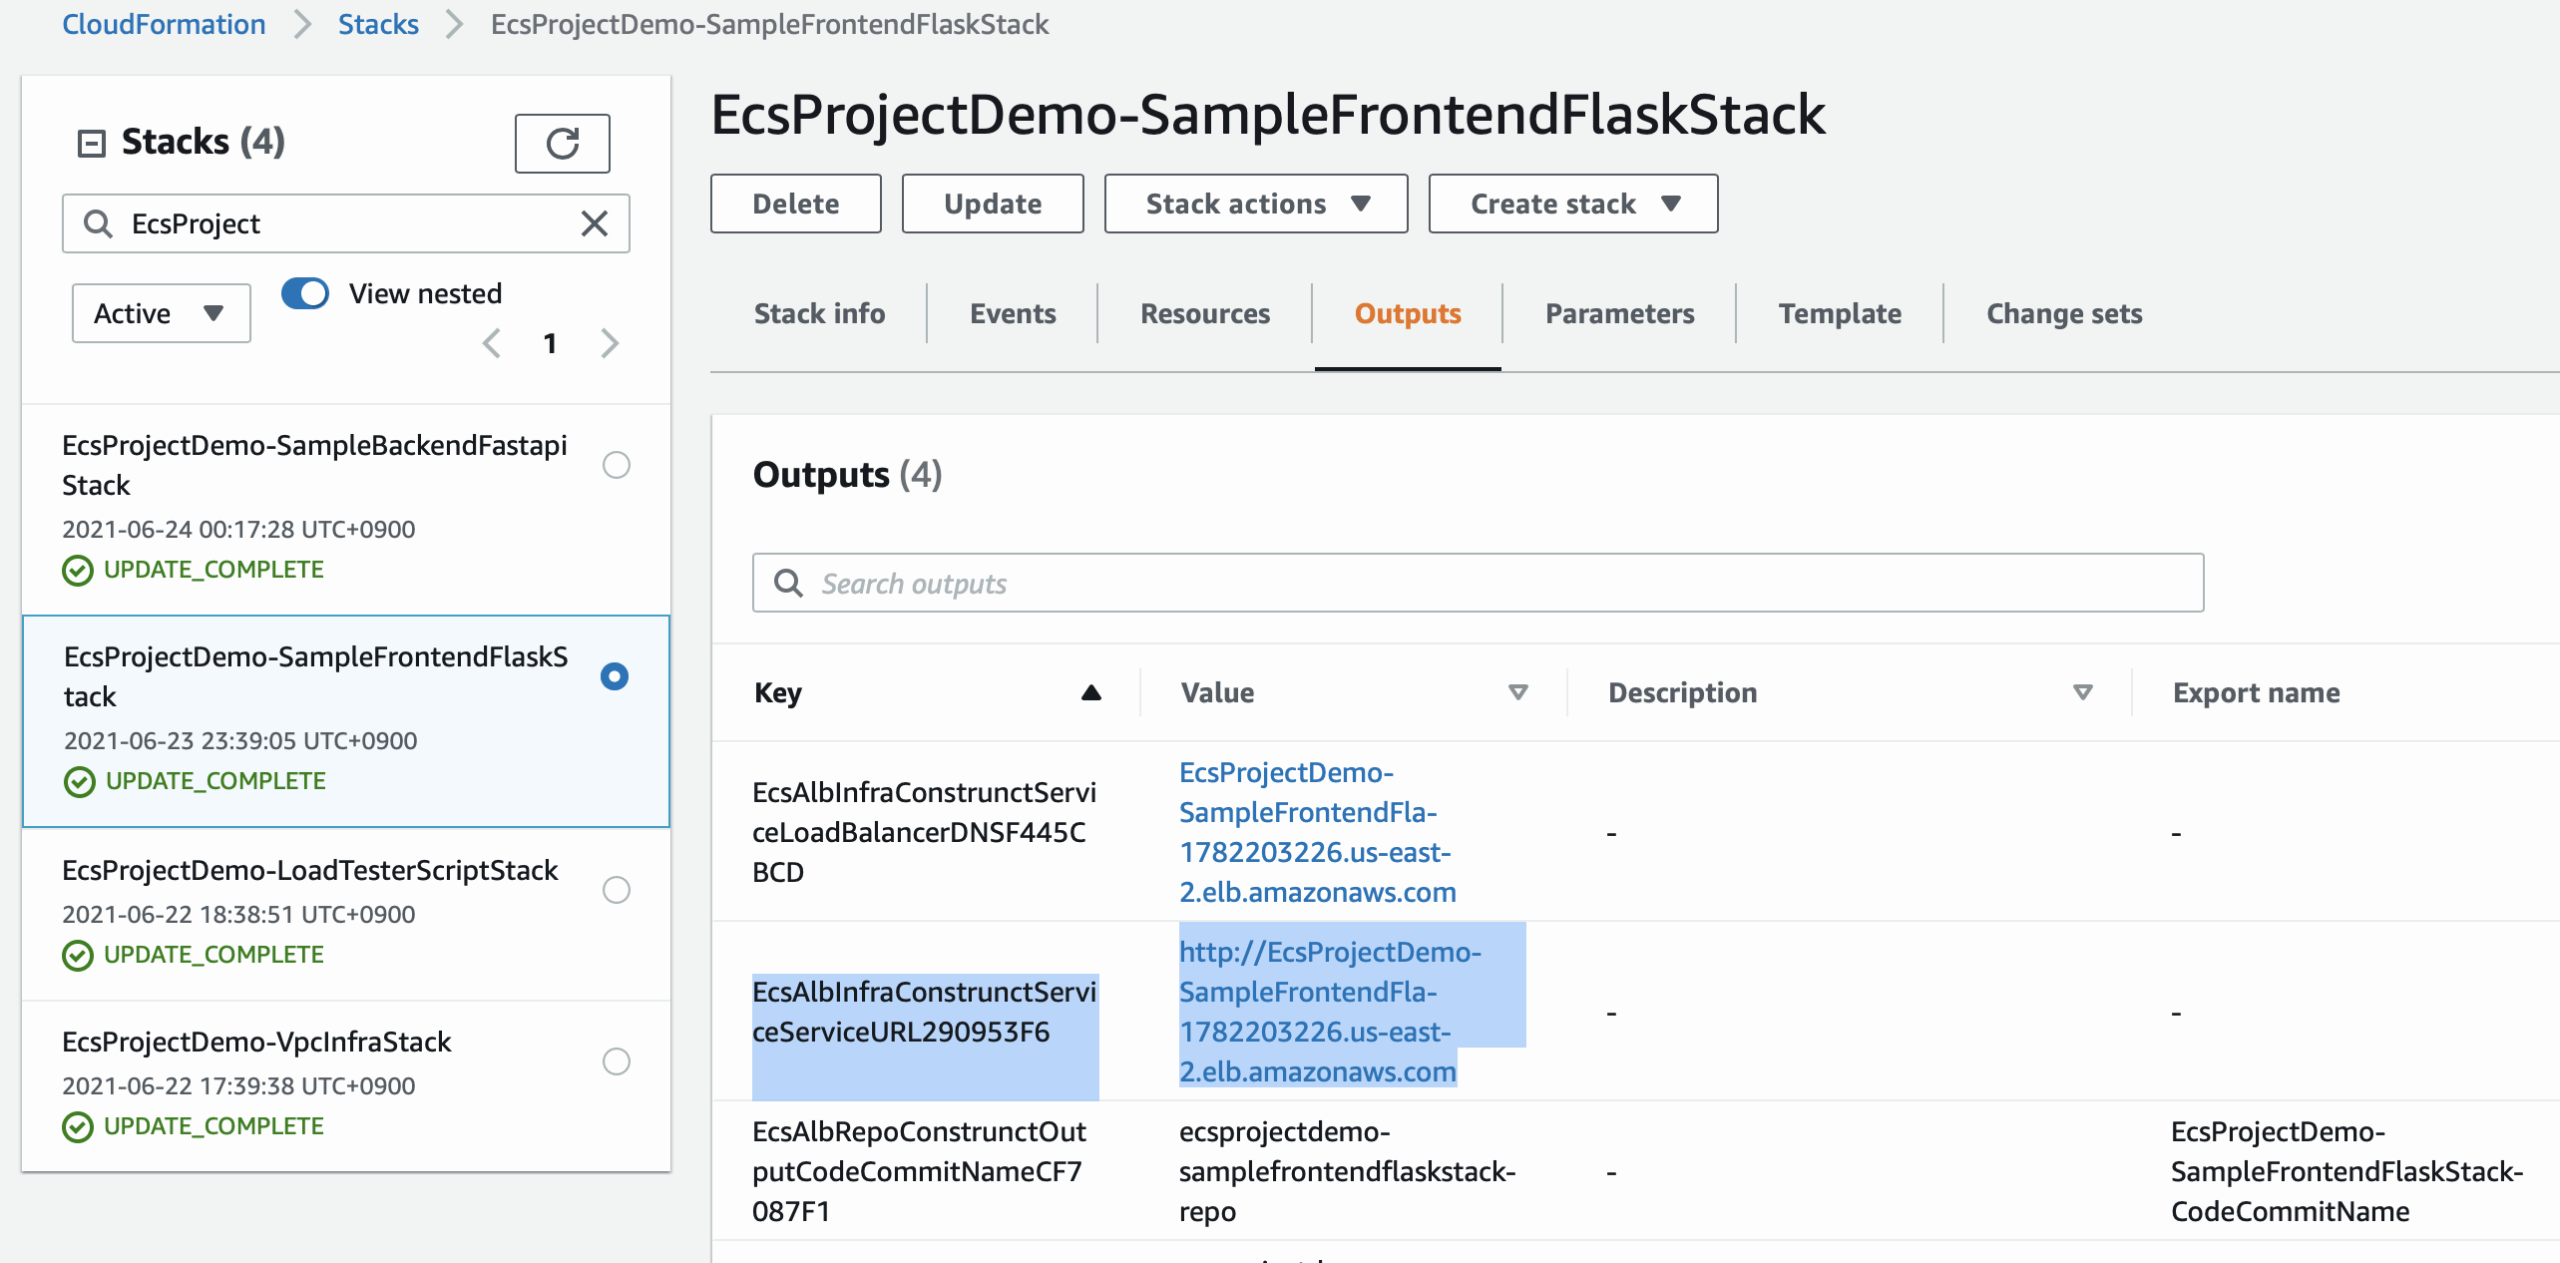
Now you can find deployment results in AWS CloudFormation as shown in the following picture.

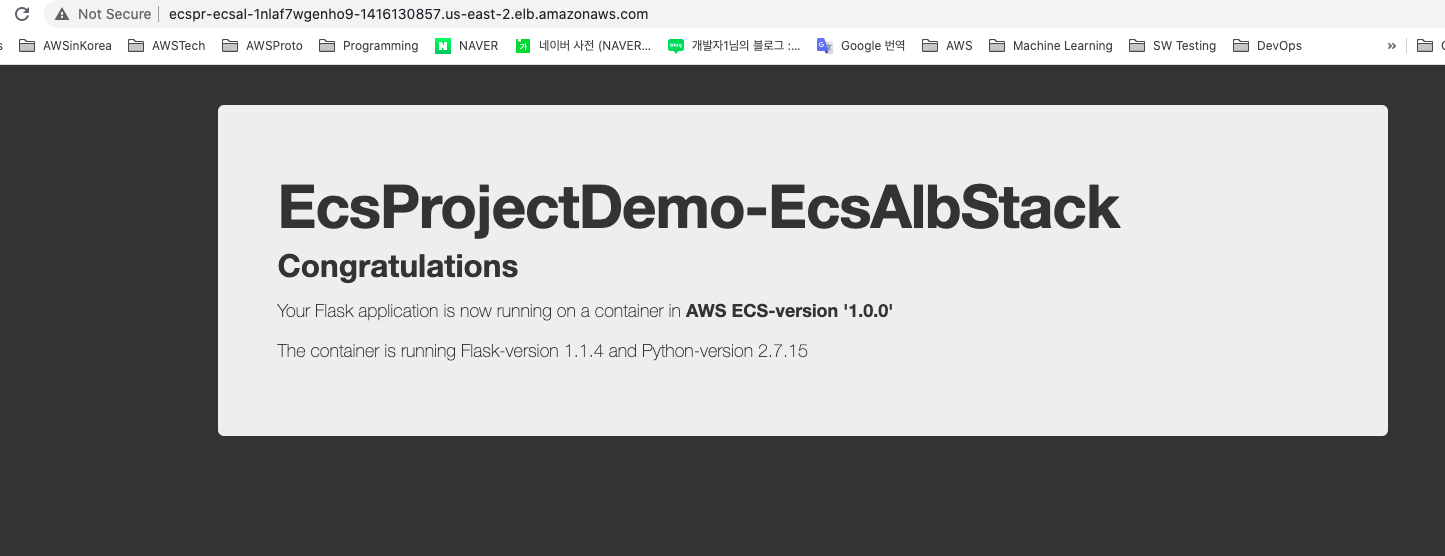
Because frontend is provided through public ALB(LoadBalancer’s domain name is the output of sh scripts/deploy_stacks), we can connect frontend using web browser.
...
...
Outputs:
EcsProjectDemo-EcsAlbStack.EcsAlbInfraConstrunctServiceLoadBalancerDNSF445CBCD = EcsPr-EcsAl-1TNJ82PAWJ4IV-1937786873.ap-southeast-1.elb.amazonaws.com
EcsProjectDemo-EcsAlbStack.EcsAlbInfraConstrunctServiceServiceURL290953F6 = http://EcsPr-EcsAl-1TNJ82PAWJ4IV-1937786873.ap-southeast-1.elb.amazonaws.com
...
...
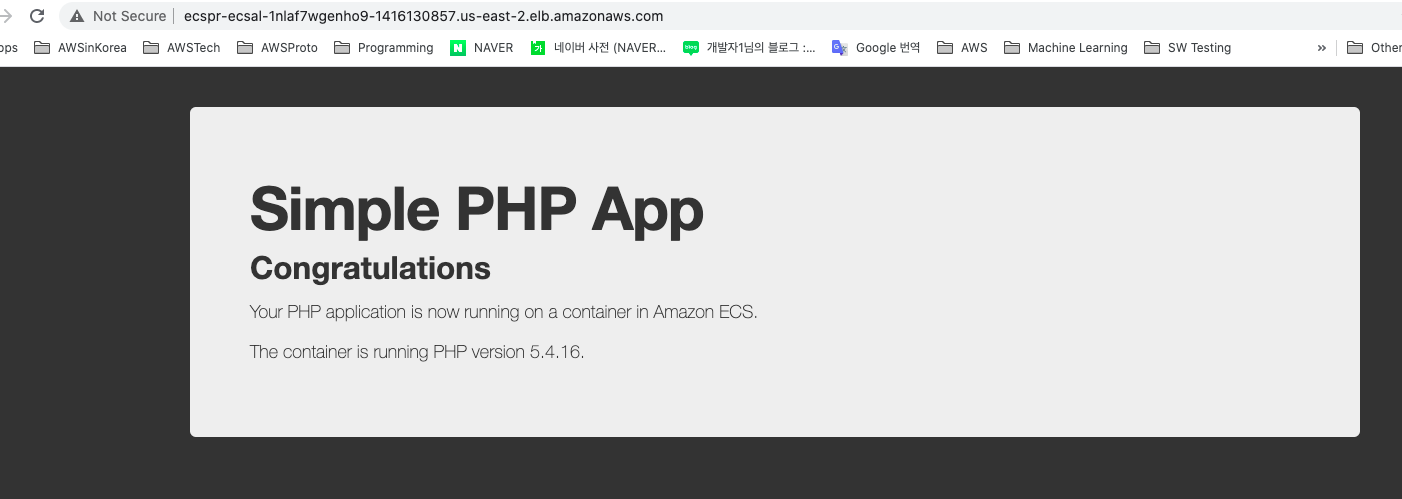
The initial web page is a php sample screen(in public DockerHub) as frontend service team haven’t uploaded their source code yet.

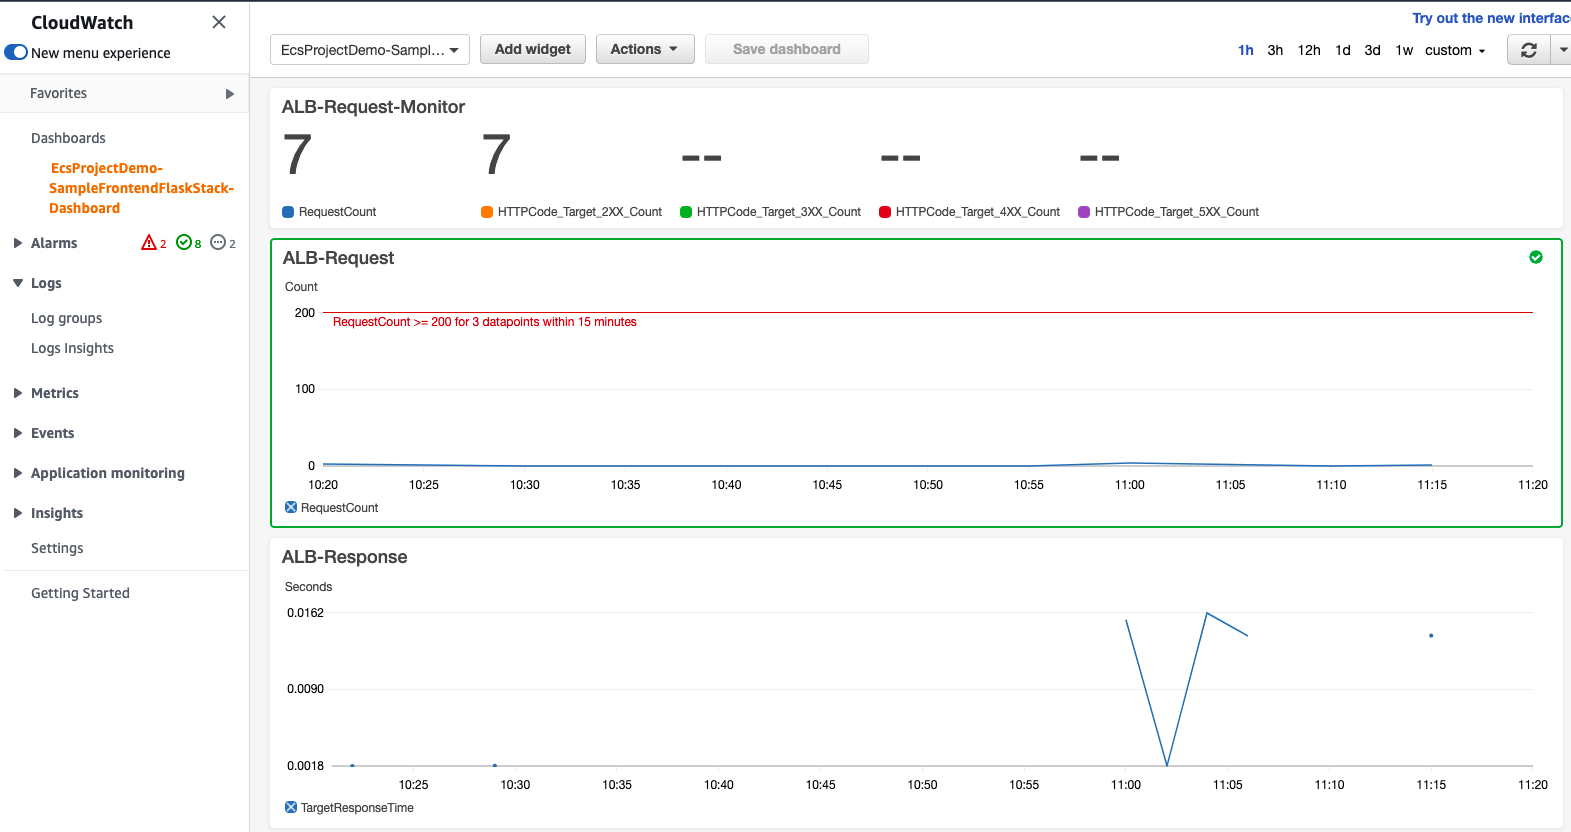
And CloudWatch’s dashboard provides the current monitoring status like this.

Because backend is provided through private ALB, we can not use web browser. LoadTesterScriptStack is provided for testing that internally in VPC, which is sending a lot of requests within the same VPC. codes/load-tester-script/app/entrypoint.sh file describes how to work in docker container, where two types of URL(URL_ALB, URL_NAMESPACE) are utilized like this.
#!/bin/sh

echo "--TEST CONFIGURATION--"
echo "RequestCount: $RequestCount"
echo "SleepPeriodInSec: $SleepPeriodInSec"

echo "--TARGET URL--"
export URL_ALB=http://$AlbDnsName/items
export URL_NAMESPACE=http://$TargetServiceName.$Namespace/items
echo "URL_ALB>> $URL_ALB"
echo "URL_NAMESPACE>> $URL_NAMESPACE"


function ab_function {
    echo --ALB-RESPONSE-TEST--
    curl -X GET $URL_ALB
    ab -n $RequestCount -c 1 $URL_ALB

    echo --NS-RESPONSE-TEST--
    curl -X GET $URL_NAMESPACE
    ab -n $RequestCount -c 1 $URL_NAMESPACE

}

echo "--START LOAD TEST--"
while true; do ab_function; sleep $SleepPeriodInSec; done
If you want to change request-load, please change these values(DesiredTasks, RequestCount, SleepPeriodInSec) in app-config-demo.json and re-deploy LoadTesterScriptStack stack.
"LoadTesterScript": {
"Name": "LoadTesterScriptStack",
"TargetStack": "SampleBackendFastapiStack",
"AppPath": "codes/load-tester-script",
"DesiredTasks": 1,
"RequestCount": 10,
"SleepPeriodInSec": 1
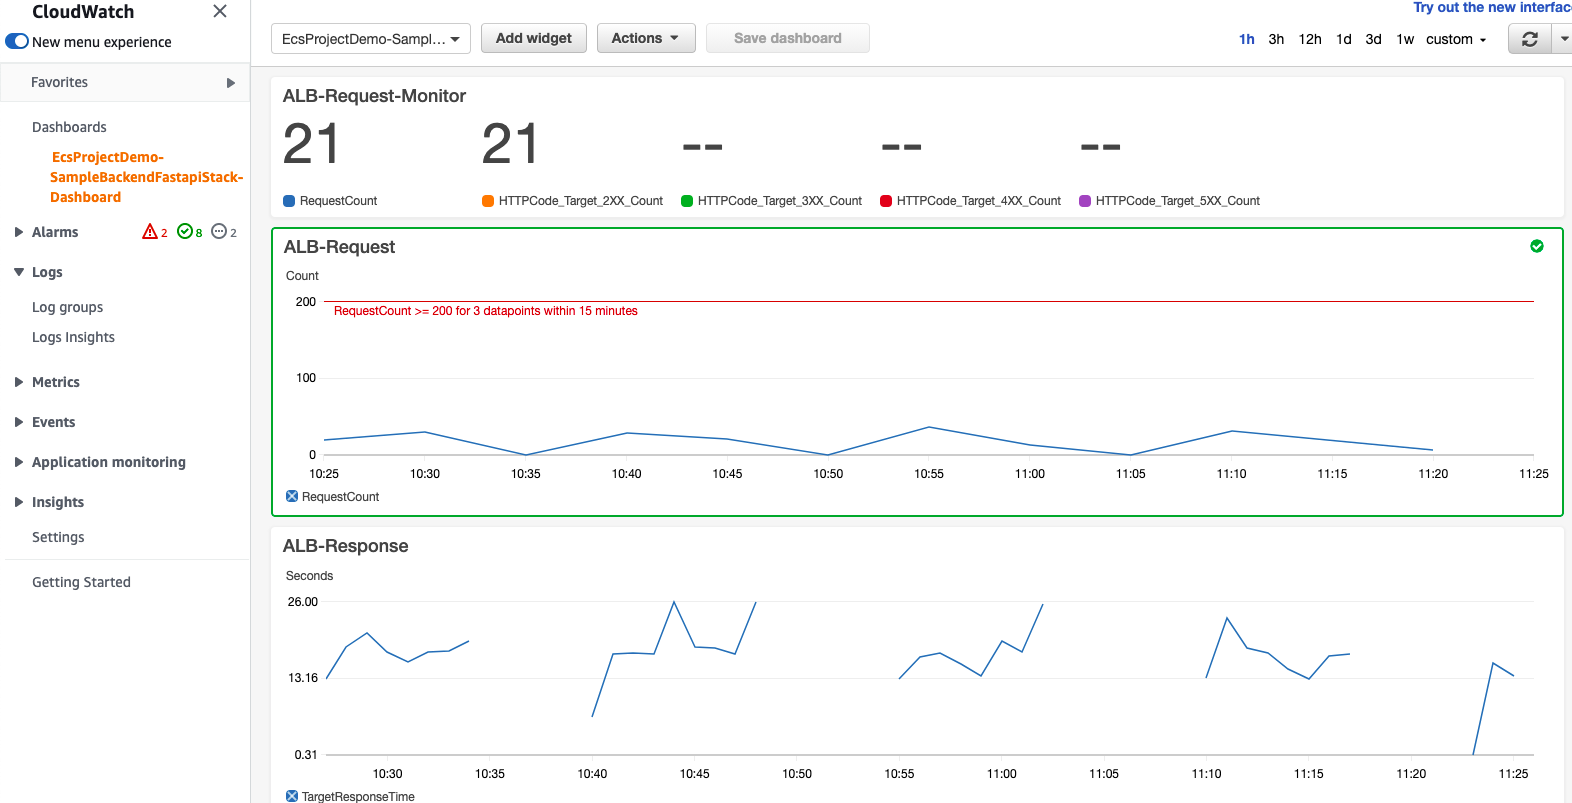
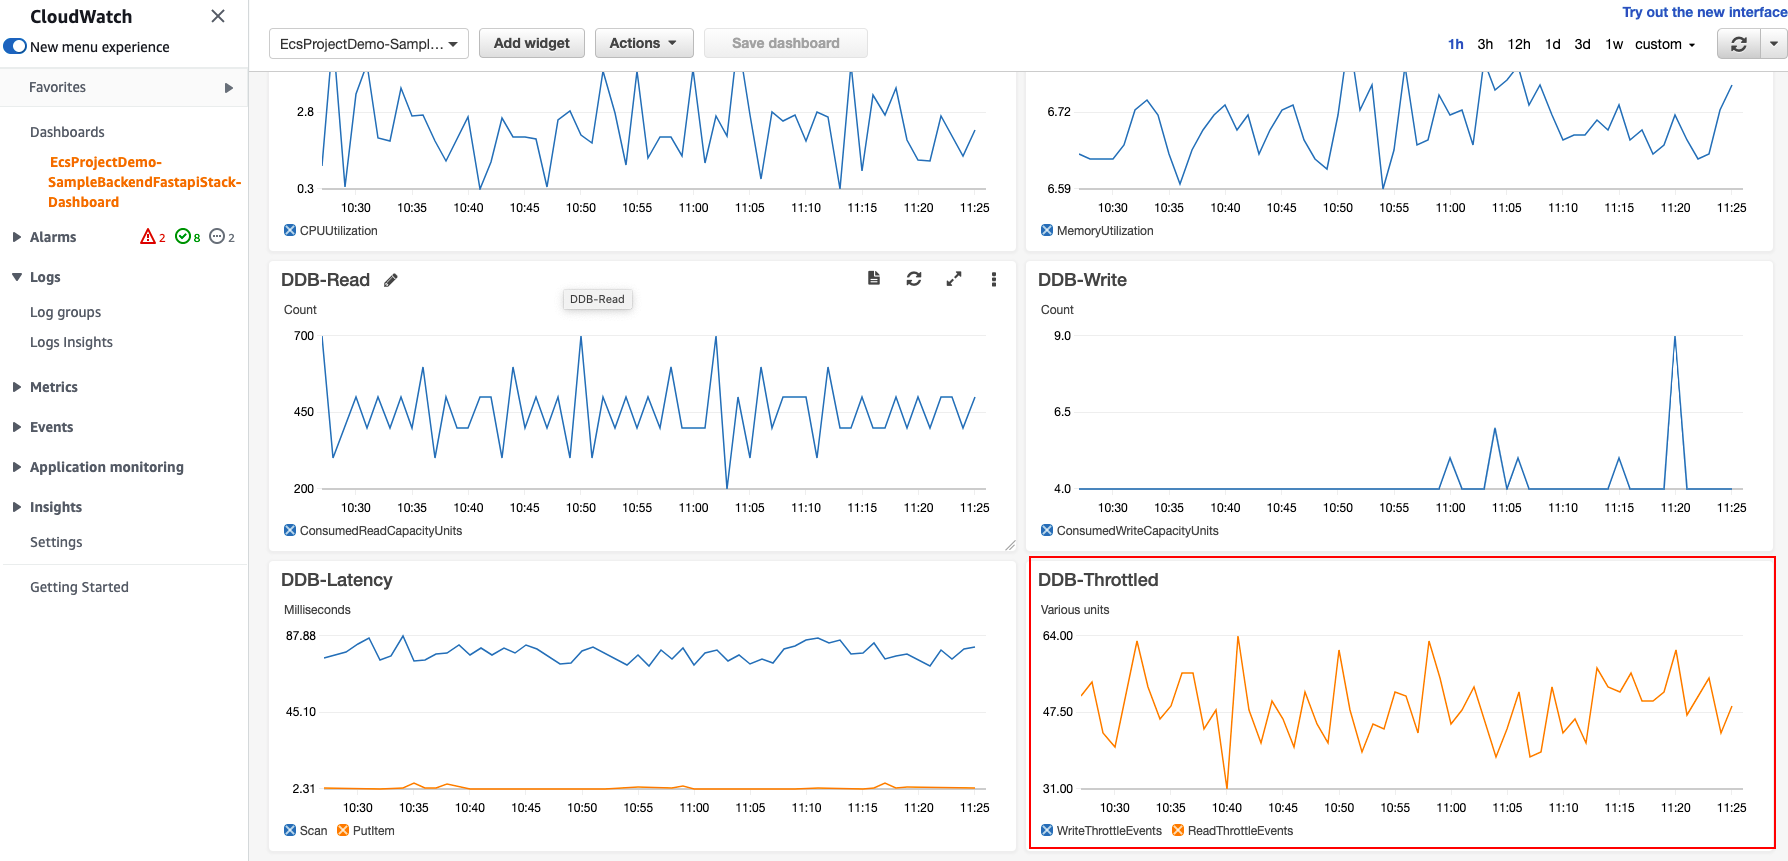
}And CloudWatch’s dashboard provides the current monitoring status like this.

Caution: Because the current DDB table’s capacity is very low, RequestCount is also low. The answer to this can be found through below graph. That is, DDB table’s throttle metric continued to occur and the backend could not respond quickly, resulting in low TPS. To solve this issue, please change the ecs-infra-consts.ts file to increase RCU in DDB Table. What should we do to control these values from the outside? I’ll leave this as a homework assignment.

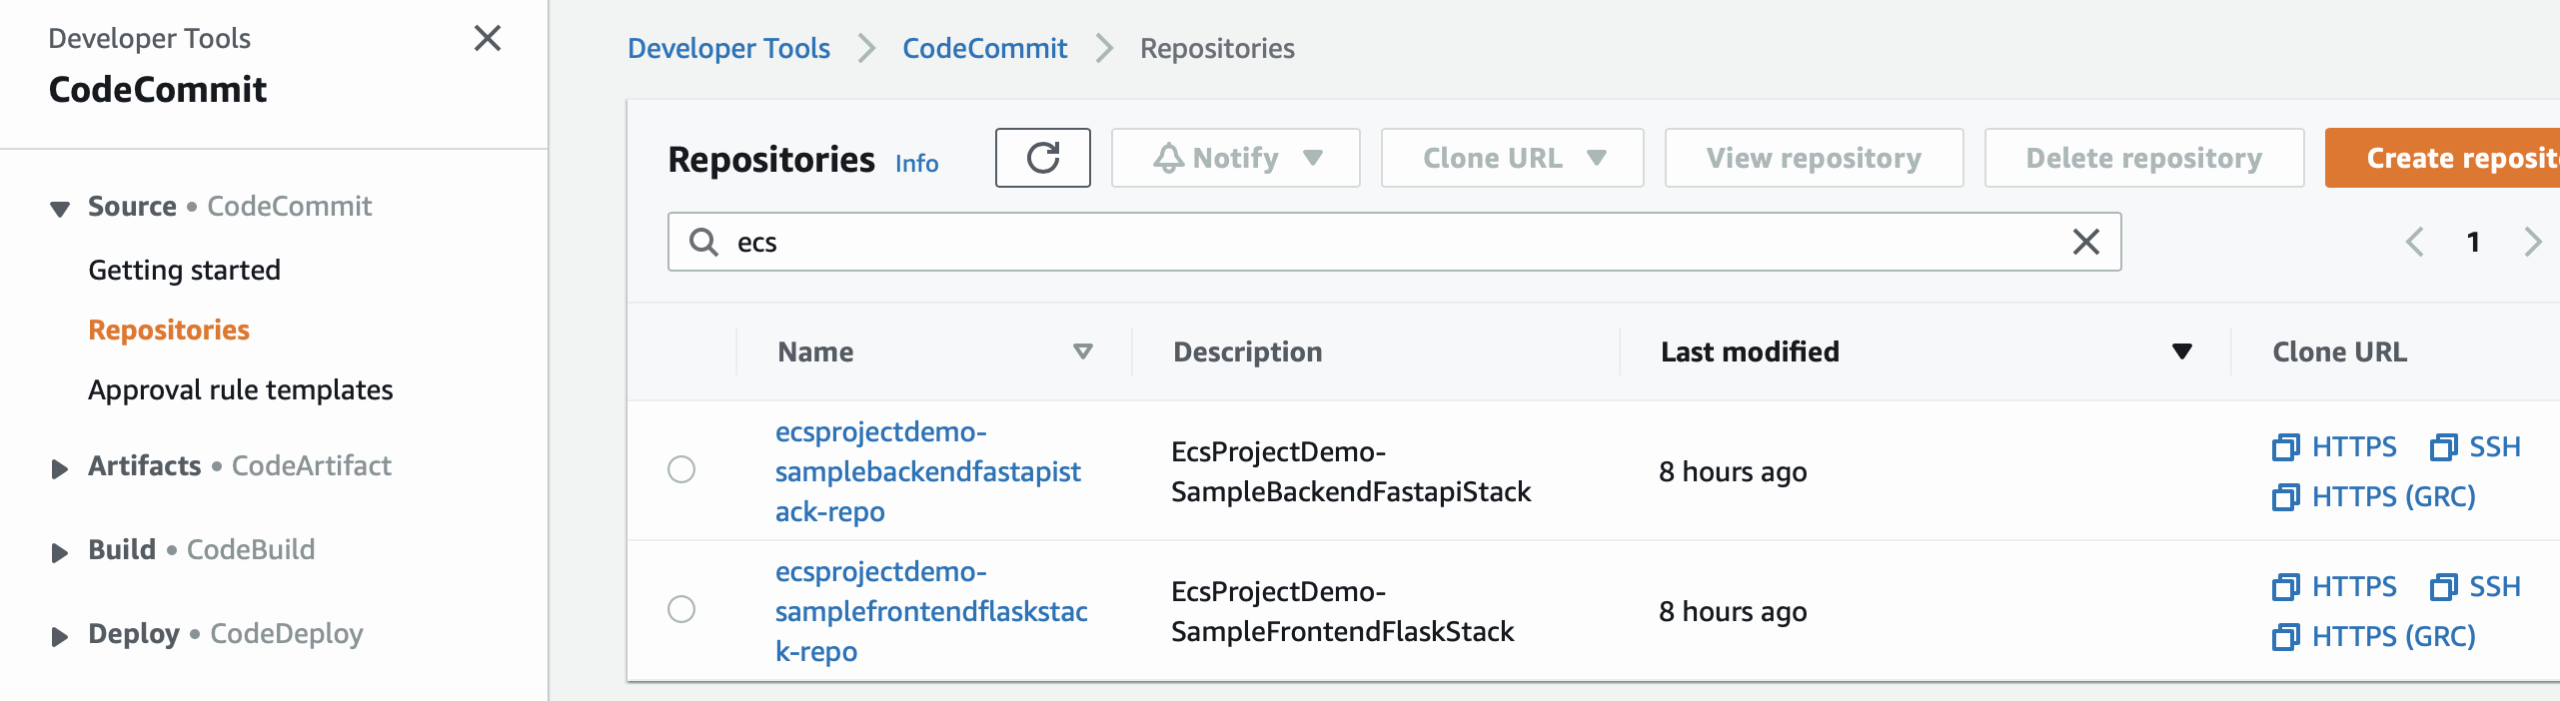
DevOps team(engineers) created CodeCommit(source repoistory)/ECR(docker repository) repository throught AWS CDK’s stacks. Please visit CodeCommit in AWS management web console, note the repository address in CodeCommit and share it with backend developers and frontend developers.

When frontend/backend service team(developers) receives the Git address, they clone each address and start developing the project. When each developer commit and puth to Git, CICD pipeline is triggered.
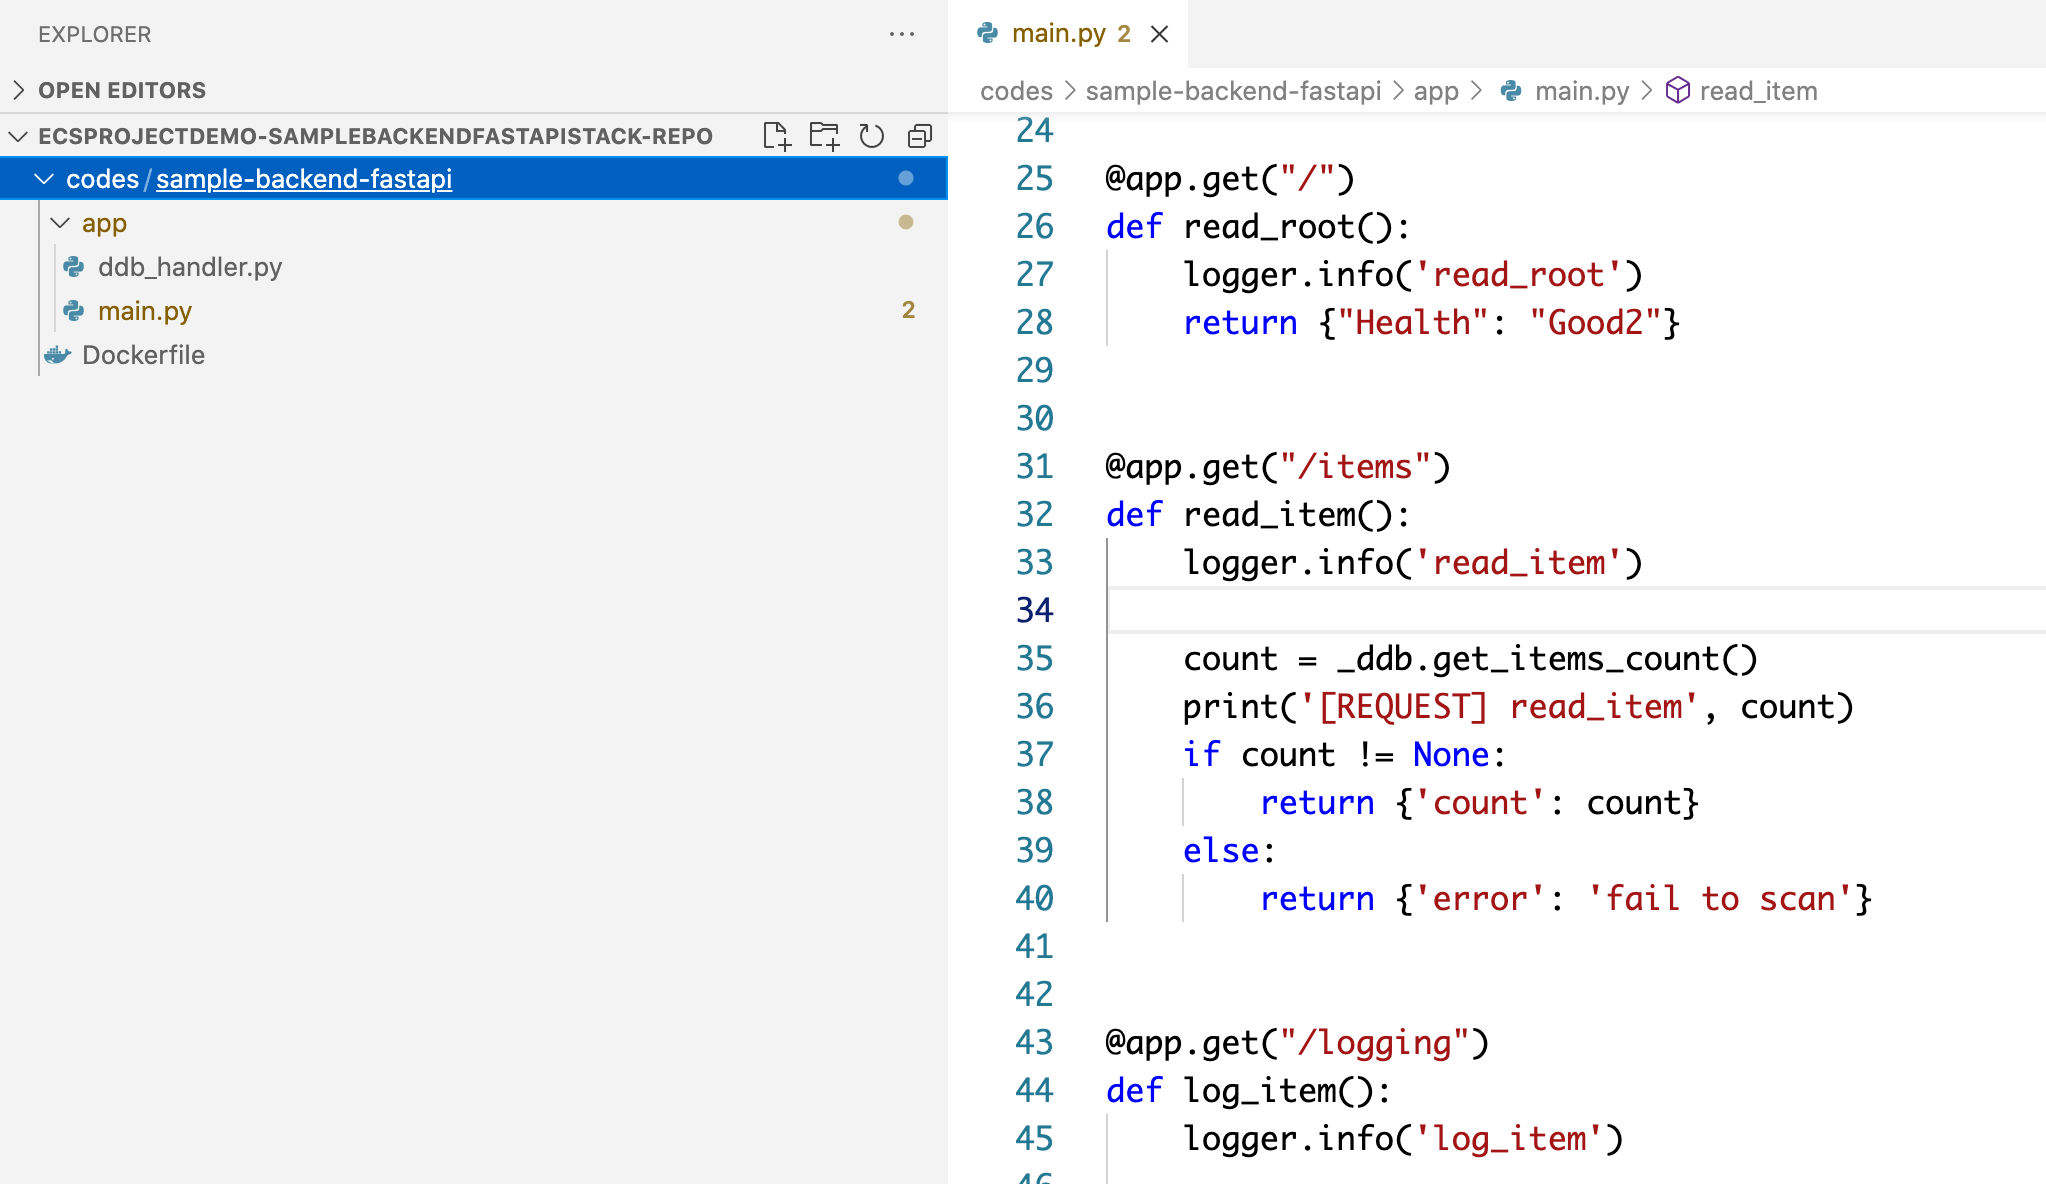
For example, backend service developer’s project looks like this, where code/sample-backend-fastapi path must match AppPath in app-config-demo.json.

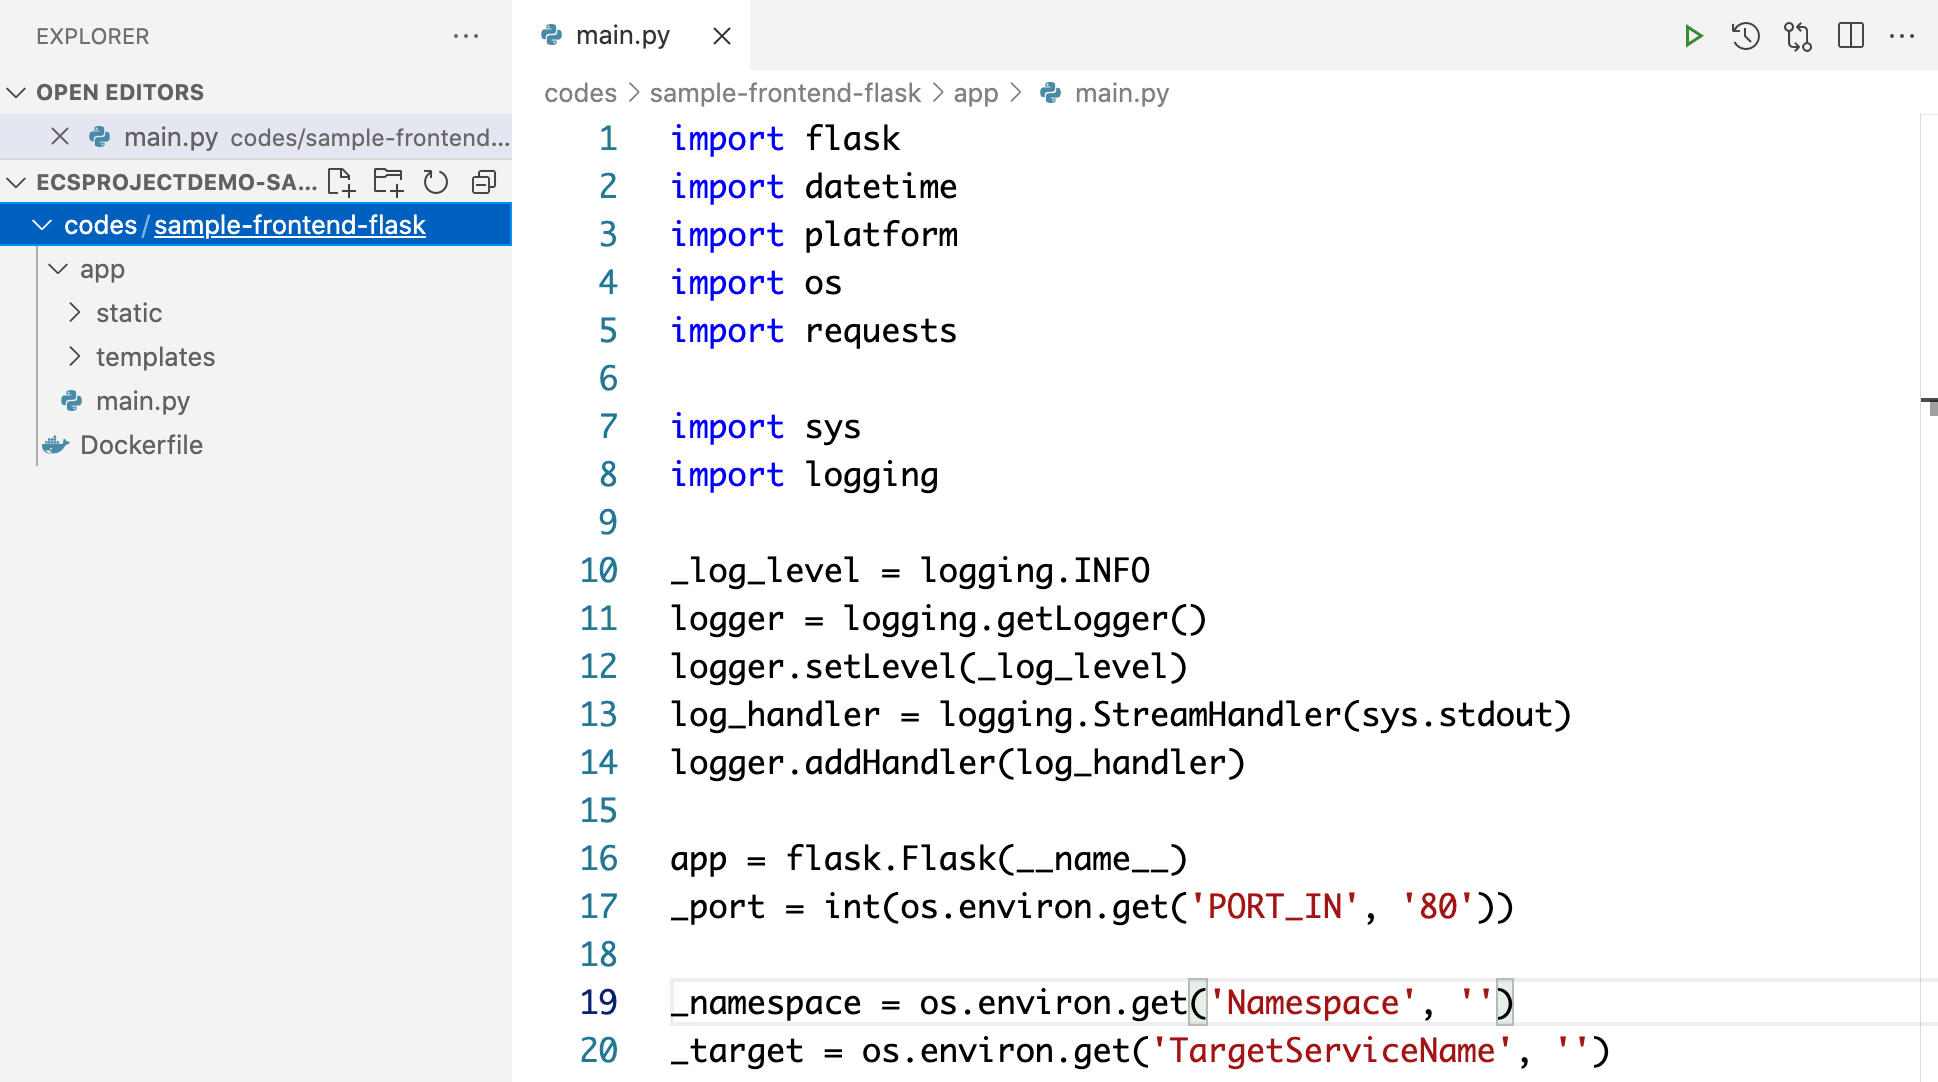
For example, frontend service developer’s project looks like this, where code/sample-frontend-flaskweb path must match AppPath in app-config-demo.json.

For convenience, I have prepared sample codes in codes/sample-backend-fastapi and codes/sample-frontend-flask path, but actually these codes should be managed in separate repositories.
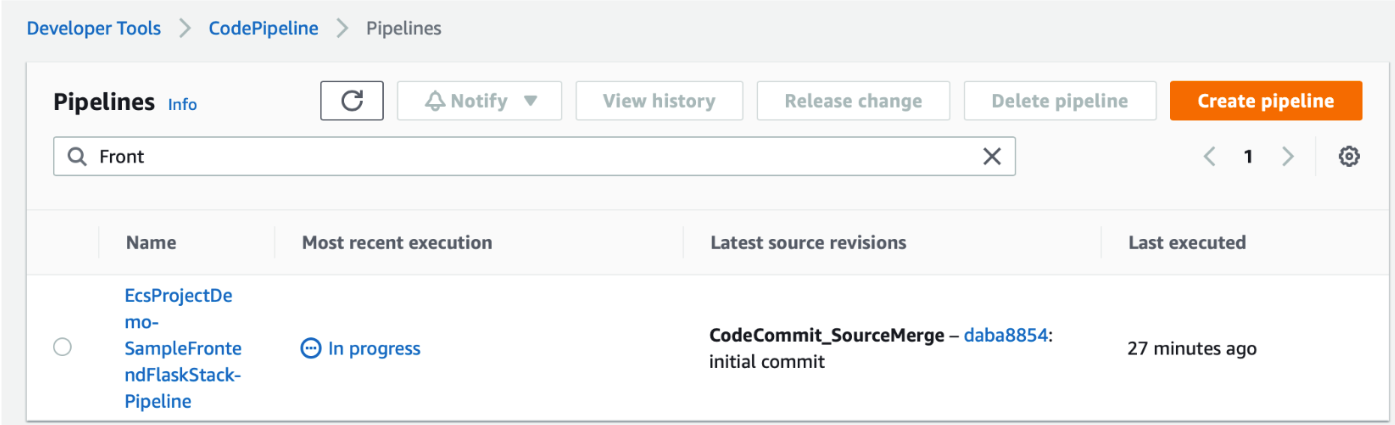
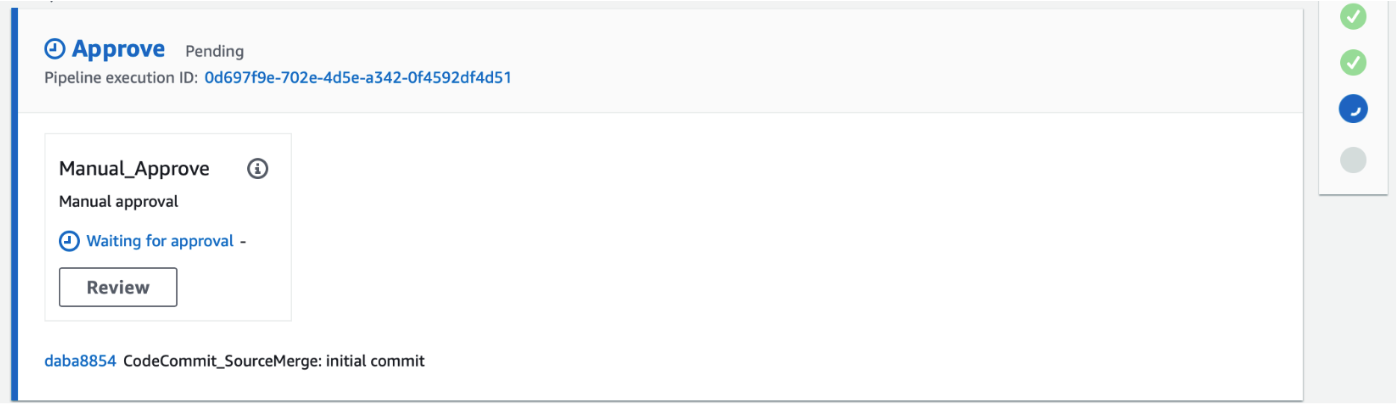
Once CodePipeline starts, this builds each docker image, and push it to ECR, and wait for Review button to be clicked on ECS Deployments.
CodePipeline is in In Process.

CodePipeline is waiting for Review button to be clicked.

After provisioning, you can check the updated web page like the following screen.

After the business logic of each service is deployed through ECR, each stack’s configuration must be changed so that the infrastructure deployment also refers to ECR.
Just change DockerImageType from HUB to ECR in each stack configuration below.
"SampleBackendFastapi": {
    "Name": "SampleBackendFastapiStack",
    ...
    ...
    "DockerImageType": "HUB", <----- ECR
    "DockerImageType-Desc": "HUB or ECR or LOCAL",
    ...
    ...
},Just add a new stack configuration in config/app-config-demo.json. And then instantiate EcsAlbServiceStack in infra/app-main.ts with the new stack configuration.
For example, if your new stack is named UserBackendSpringStack, you can work in pairs like this:
...
...
"UserBackendSpring": {
    "Name": "UserBackendSpringStack",
    "InfraVersion": "'1.0.0'",
    "DockerImageType": "HUB",
    "DockerImageType-Desc": "HUB or ECR or LOCAL",

    "PortNumber": 80,
    "InternetFacing": false,

    "AppPath": "codes/user-backend-spring",
    "DesiredTasks": 1,
    "Cpu": 1024,
    "Memory": 2048,

    "AutoScalingEnable": false,
    "AutoScalingMinCapacity": 1,
    "AutoScalingMaxCapacity": 2,
    "AutoScalingTargetInvocation": 50,

    "TableName": "LogTable",

    "AlarmThreshold": 200,
    "SubscriptionEmails": ["kwonyul@amazon.com"]
},
...
......
...
new EcsAlbServiceStack(appContext, appContext.appConfig.Stack.UserBackendSpring);
...
...Since EcsAlbServiceStack abstracts each service(CodeCommit, ECR, ECS Service/Task, Dashboard, CICD Pipeline), everything can be automated by instantiating objects with proper configuration. This is one of the great advantages of AWS CDK.
If you want to change or extend the functionality for EcsAlbServiceStack, define a new class that inherits from EcsAlbServiceStack.
For example, if you want to replace the database from DDB table to RDS database, this is the right situation.
Execute the following command, which will destroy all resources except ECR-Repository and DynamoDB Tables. So destroy these resources in AWS web console manually.
sh ./scripts/destroy_stacks.sh config/app-config-demo.jsonIn particular, LoadTesterScriptStack is currently under load-testing and should be deleted as soon as possible like this.
cdk destroy *LoadTesterScriptStack --profile [optional: your-profile-name]See CONTRIBUTING for more information.
The documentation is made available under the Creative Commons Attribution-ShareAlike 4.0 International License. See the LICENSE file.
The sample code within this documentation is made available under the MIT-0 license. See the LICENSE-SAMPLECODE file.
 https://github.com/aws-samples/aws-ecs-devops-using-aws-cdk


