ARDUINO UNO BASED FINGERPRINT ATTENDANCE SYSTEM WITH PROTEUS SIMULATION FILE
This project demonstrates the interface between a fingerprint sensor and an Arduino Uno board. The system utilizes a 16×2 LCD to guide the user through the enrollment and scanning process. The fingerprint sensor is used for capturing and recognizing fingerprints.
Adafruit Fingerprint Sensor Library (link to the library)
Proteus installed in your system (simulation purpose)
Hardware Setup
LCD
Aduino Board
RS
Pin 7
RW
GND
E
Pin6
D4
Pin5
D5
Pin4
D6
Pin3
D7
Pin2
Fingerprint Sensor
Aduino Board
GND
GND
VCC
5V
RX
RX
TX
TX
Libraries
Adafruit Fingerprint Sensor Library
LiquidCrystal Library
Project Description
In this implementation of fingerprint sensor interface with Arduino Uno board. For input, I used Four push buttons. The menu on LCD guides the enrollment and scanning process.
An exercise to better understand the workings of blockchains and cryptocurrencies.
Completely made with python and a sqlite3 database, implements the key features of a blockchain, such as:
Distributable: every block must exist and be in its place in order for the chain to be healthy;
Proof of Work: done by randomly chosen miners;
Secure: PBKDF authentication, with the use of salts;
Fast checking of chain integrity
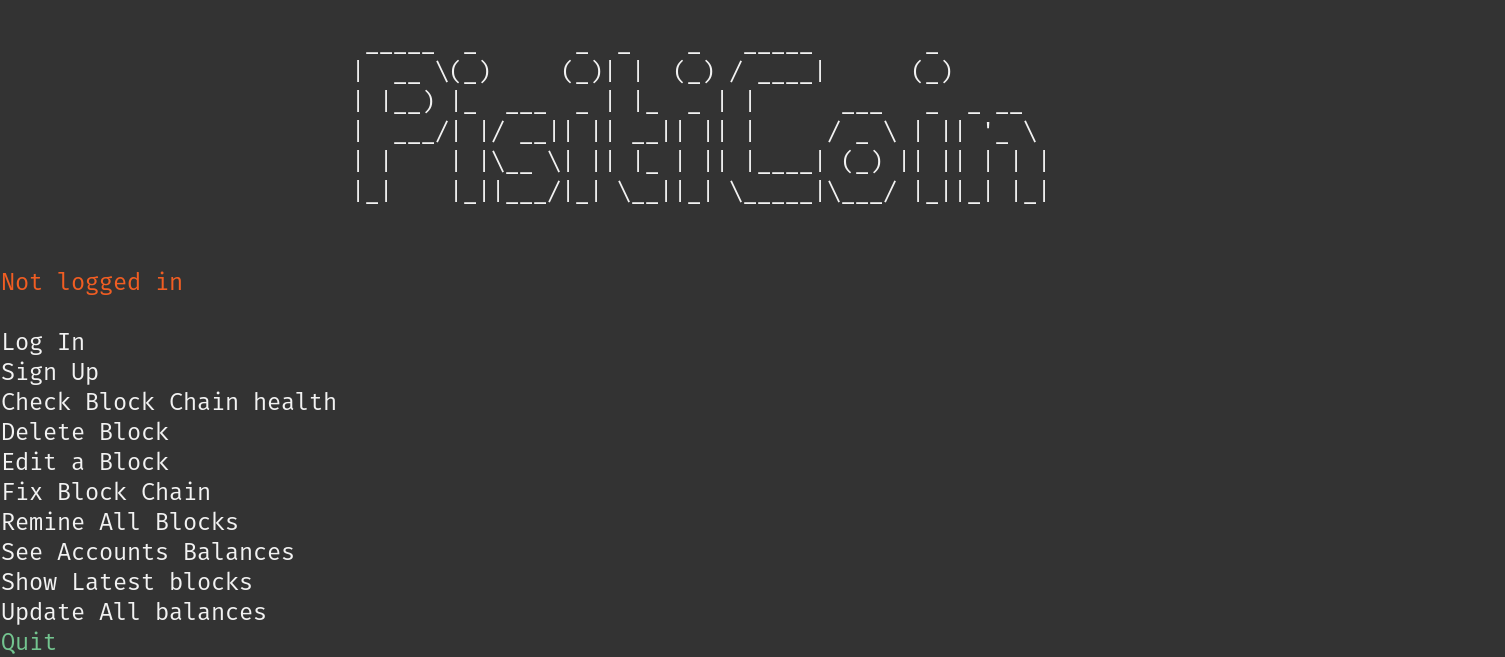
Is Packaged with a custom CLI:
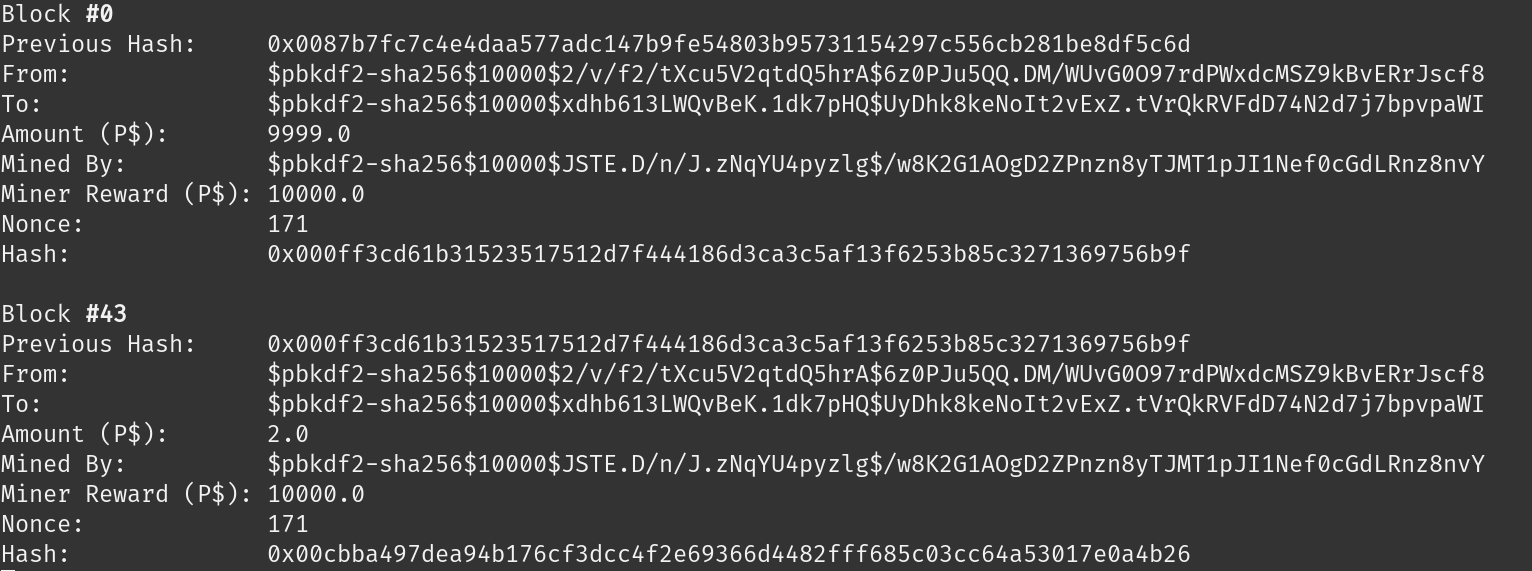
Blocks stored in the database contain the following nodes:
Custom made:
SHA256 module
Made from scratch, implements the hash function, given a given the steps of the algorithm.
CLI interface
The logo, logged in user and options need to be redefined at every command.
Getters and setters were implemented.
An example is the change in options when a user is authenticated (options like “send pisiticoins” are added) versus not authenticated (
options like “log in” are added).
Options menu
Using pynput, creates a listener for keys such as arrows and enter.
Although other, easier to implement, libraries exist, this was the only one that provided a solution supported in Windows and Linux.
Compatibility is one of the goals of this project.
Re-renders the screen as soon as one of those is pressed.
The module OptionsMenu.py is a collection of functions wich need to communicate with each other.
As I didn’t want to define them with many arguments each, the first idea was to create global variables.
This, however, is ill-advised in basically all the forums I researched.
The solution I came up with, then, was to use Environment variables.
It works nicely, even though I it is not its intended use.
One negative aspect is that they only accept strings. Therefore, the use of “true” and “false” were required.
In hindsight, a more elegant solution would be to simply wrap all of the function with a class.
The required variables would, then, be accessible by every method.
To kickstart the menu, the addition of a start() or begin() method that calls the others would suffice.
Wrapper functions for communication with this specific database
Two classes with multiple methods used to perform the various queries to the database required for the main program.
All of the communication with the sqlite db is done via these functions.
Therefore, the end user does not need to understand the underlying schema or implement custom queries.
They are devided into getters, setters and updaters.
Features
Log In/Out and Sign Up
An account id is derived using PBKDF2 with 10,000 rounds and 16 bytes long salts. Only such id is stored in the database.
Logging in repeats the process for every salt stored and matches its corresponding id.
Database is pre-populated accounts, whose passphrases are each one of the lower case letters from “a” to “m”.
Check Block Chain health
Rehashes every block, in order, to determine inconsistencies.
Delete/Edit Block
Breaks chain integrity until fixing or remining of all blocks is executed.
Fix Block Chain
Remines necessary blocks.
Remine All Blocks
Remines every block and tries to figure out a non destructive way of fixing the chain.
See Accounts Balances
Prompts the user for an account, then print its balance.
Send PisitiCoins
Requires user to be logged in and have a sufficiently large balance.
Show Latest blocks
Pretty prints a blocks’s information.
Update All balances
Recalculates every user’s balance by going through every block, in order.
Usage
Recomended using a virtual environment.
Install dependencies
pipinstall-rrequirements.txt
Run
python3src/PisitiCoin.py.
Create a new account or log in to one of the existing ones whose passphrases are each one of the lower case letters from “a” to “m”.
Comes with pre populated blockchain. Give it a try!
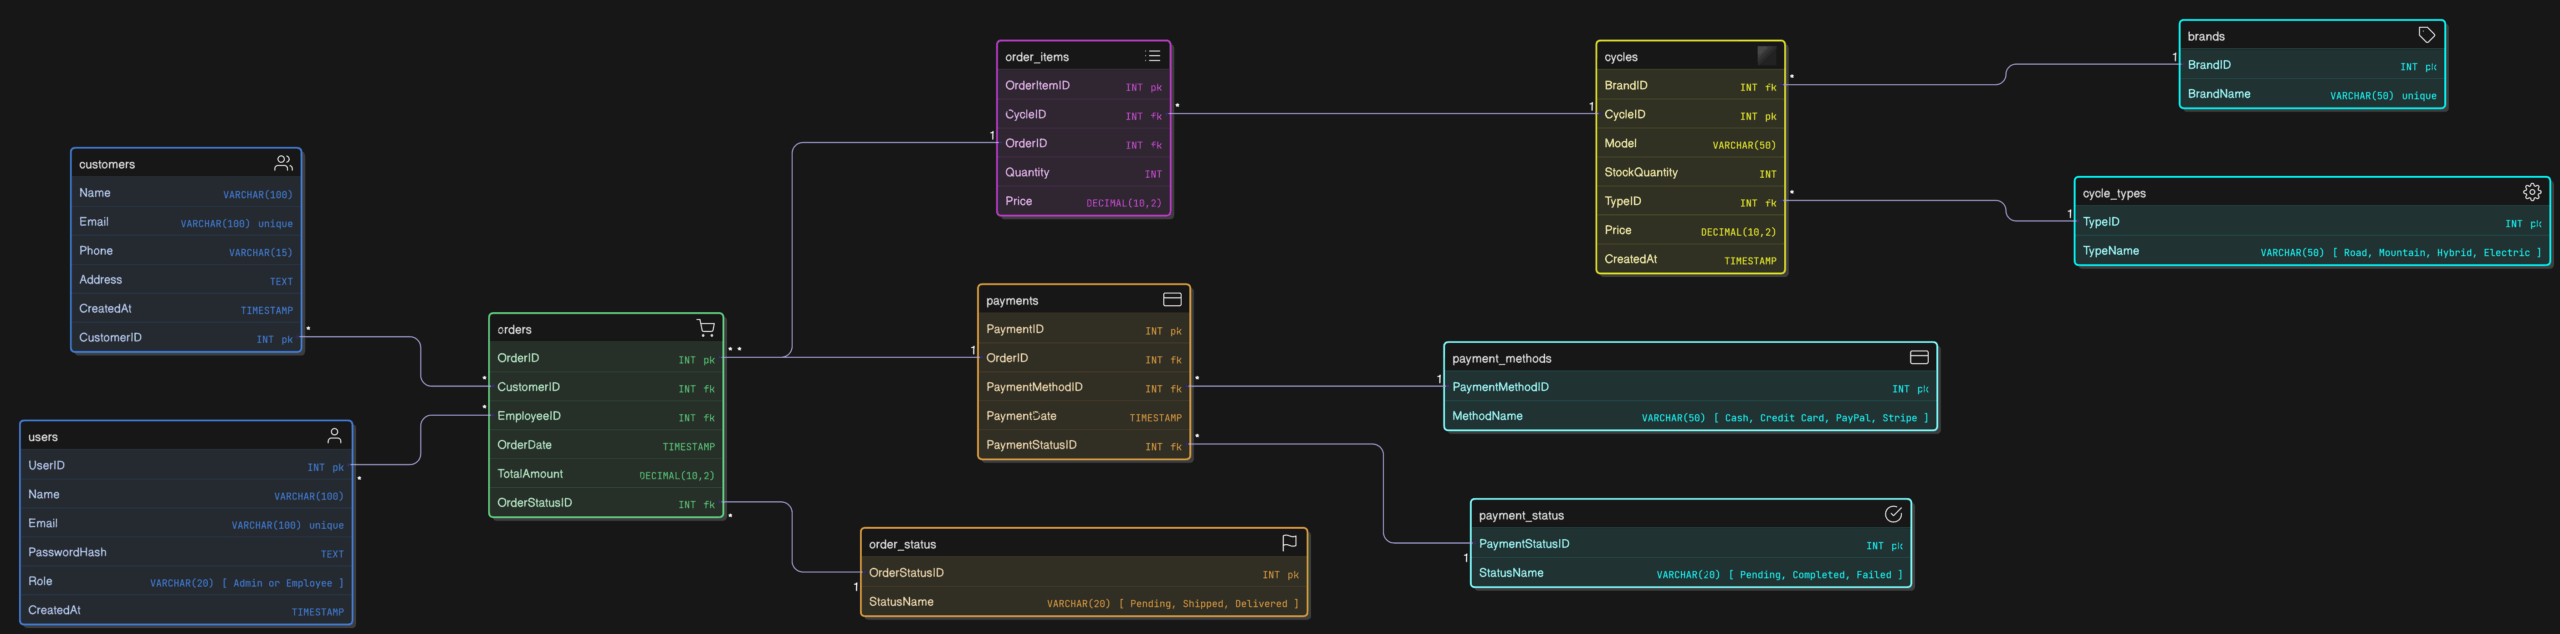
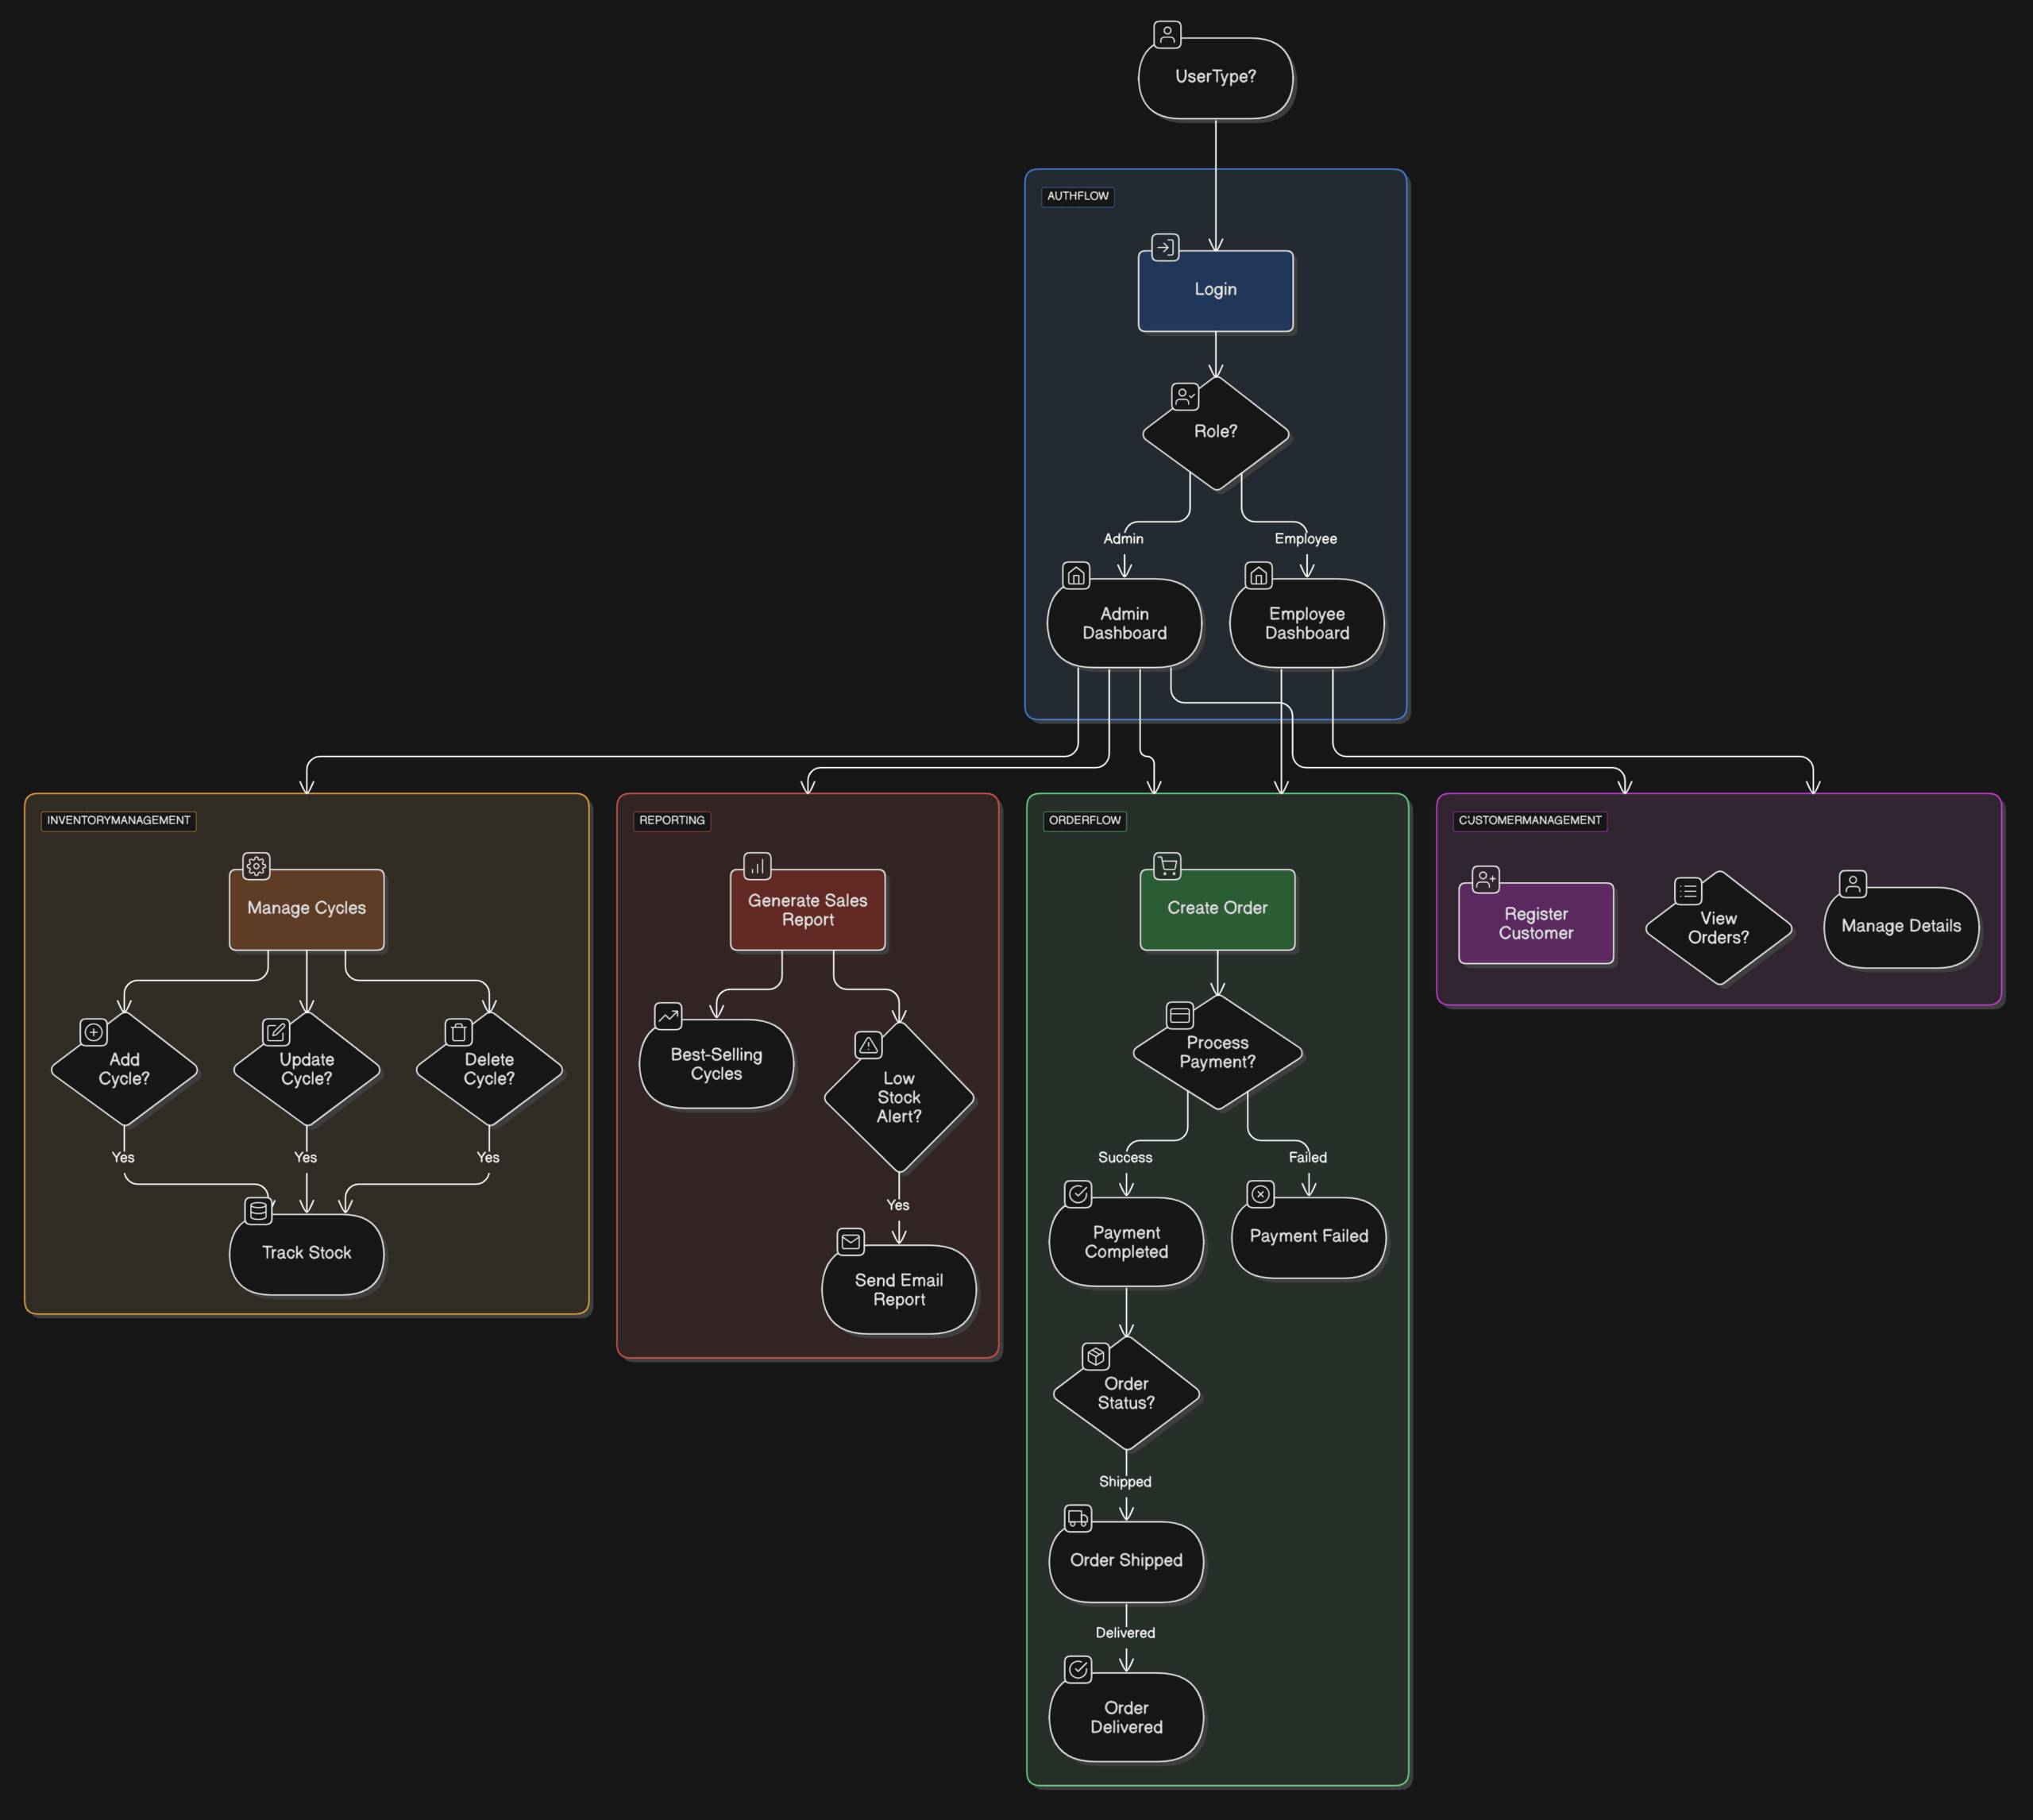
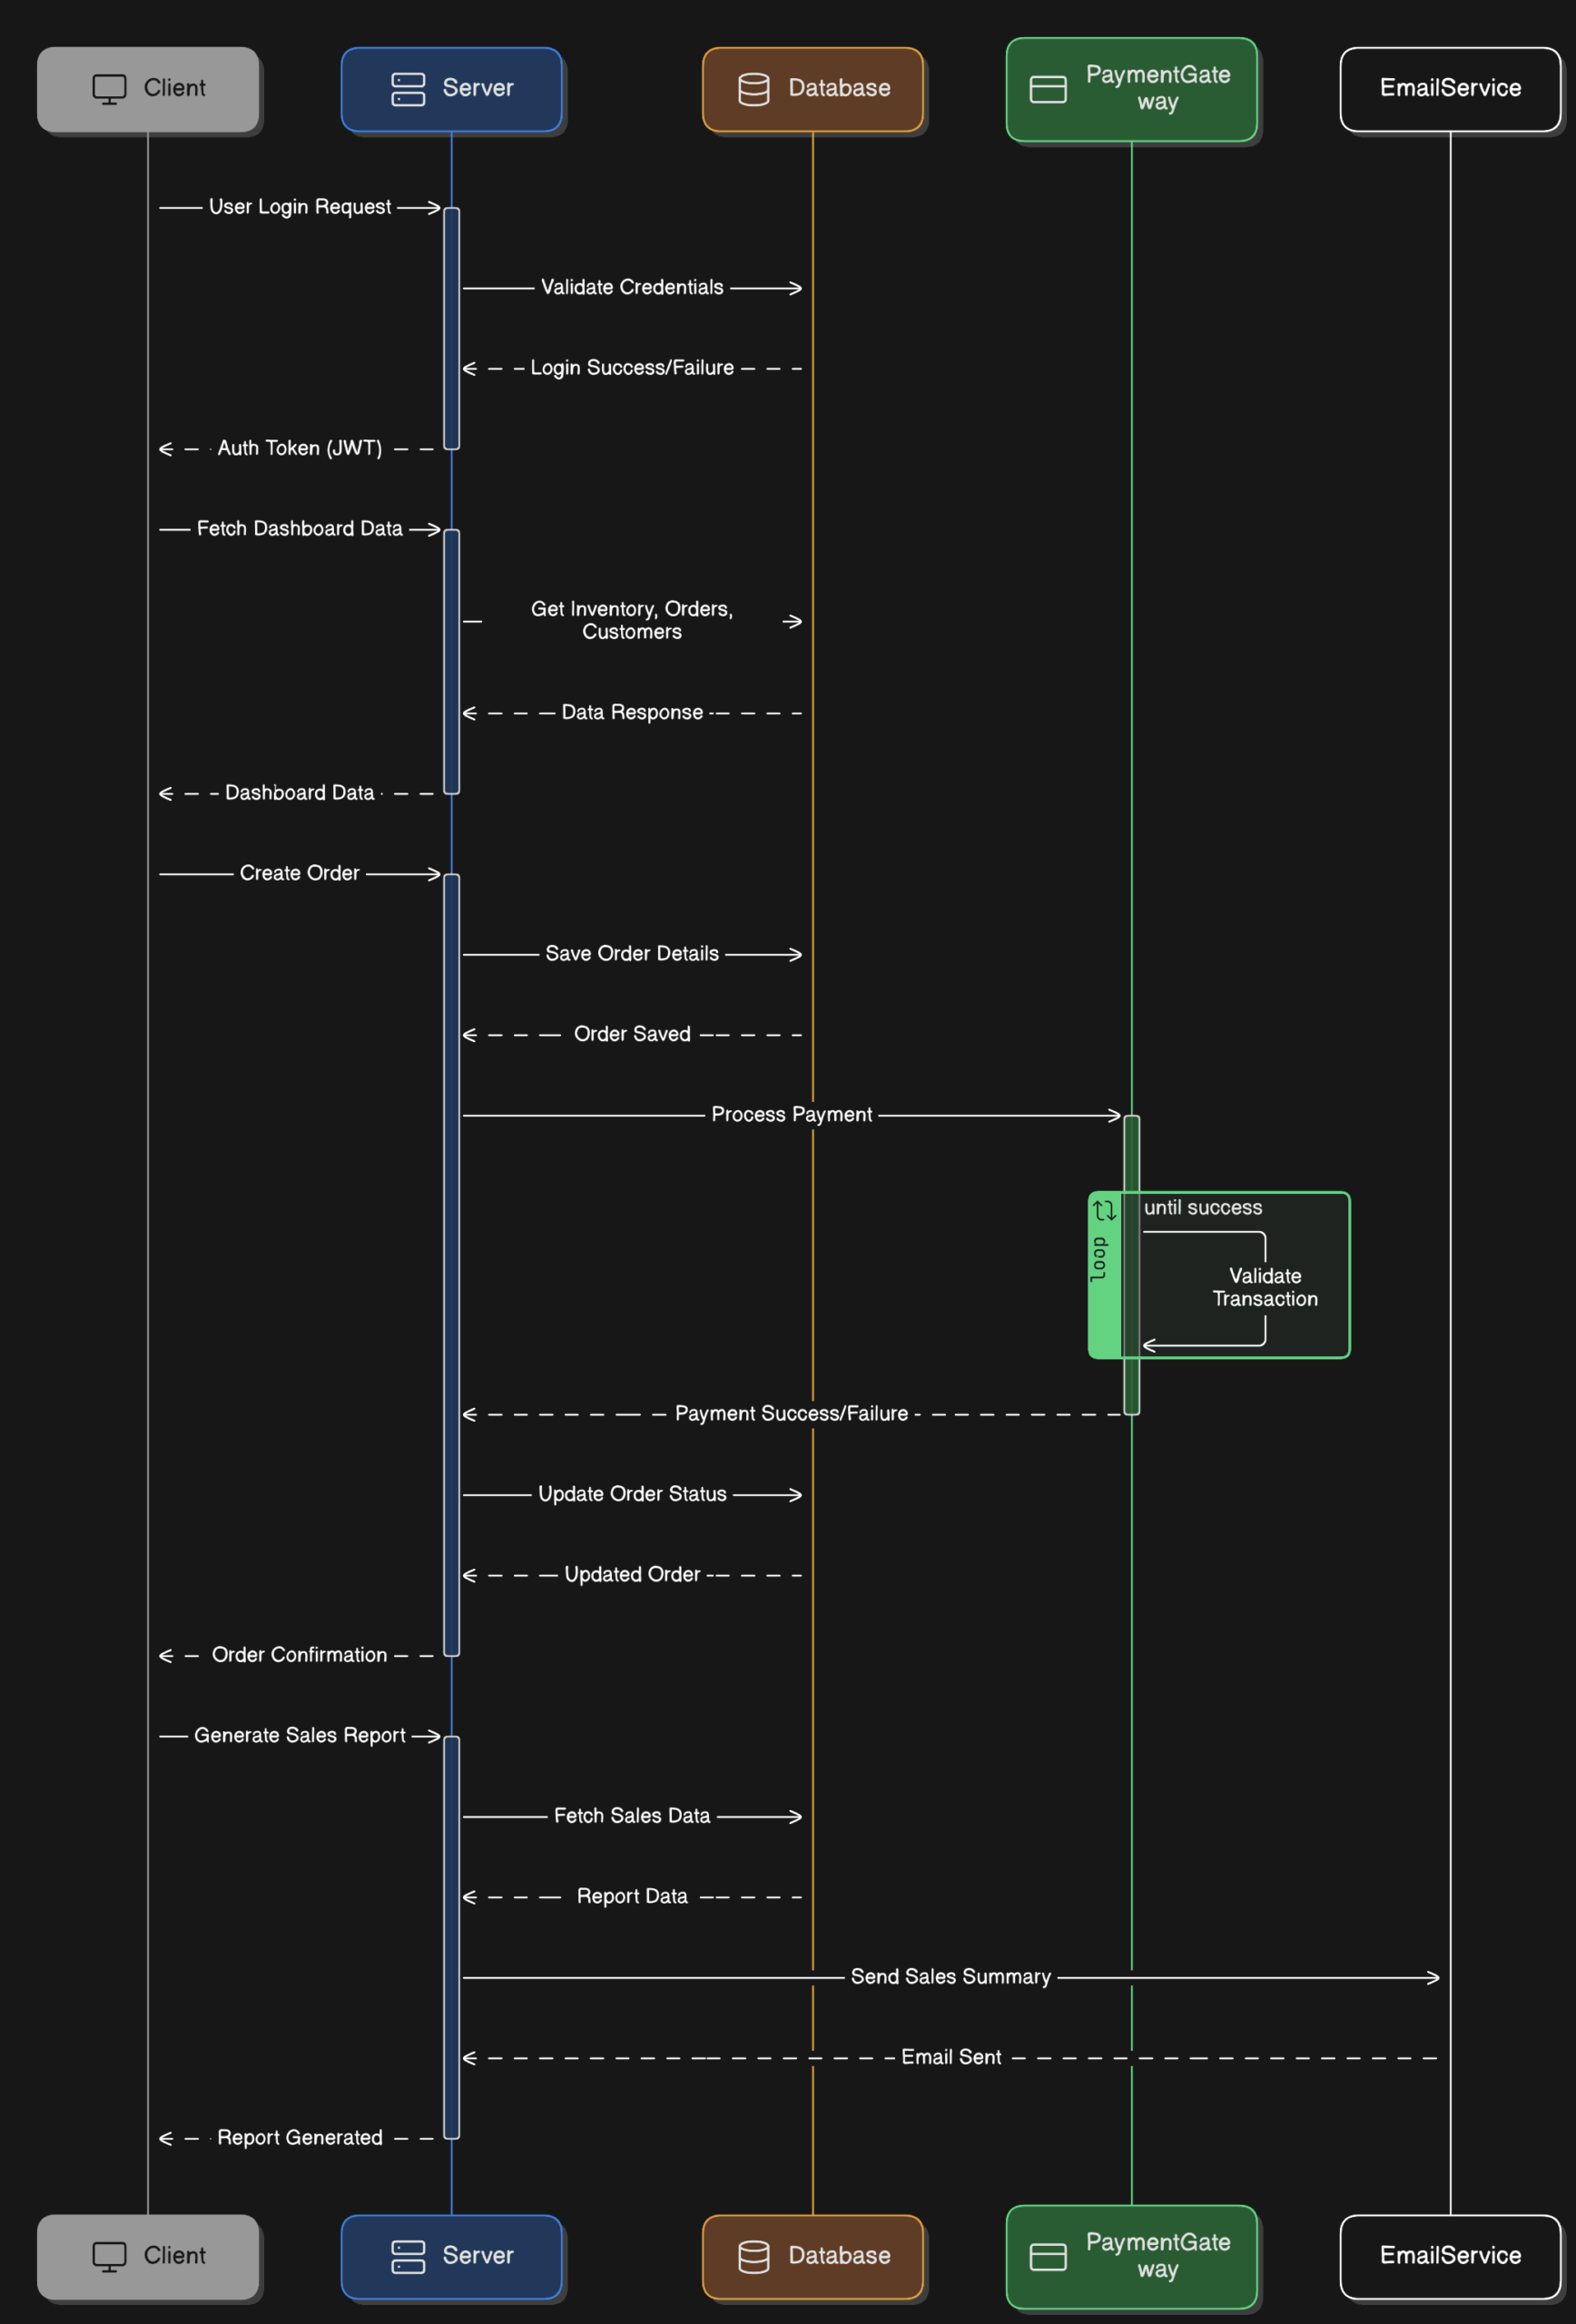
A modern, feature-rich e-commerce backend built with .NET Core 8.0, implementing clean architecture principles. This API provides comprehensive endpoints for product management, order processing, payment handling, and customer management, using PostgreSQL for data persistence.
RubyMassMailer is a Rails API-only application designed to provide a flexible platform for sending mass transactional emails. Whether you’re sending order confirmations, password resets, or any other type of email, RubyMassMailer makes it easy to manage and send your emails.
Features
API-Only: Lightweight and efficient API-only Rails application.
Mass Email Sending: Easily send transactional emails to multiple recipients.
Customizable Templates: Use customizable email templates to fit your branding and message.
Queue Processing: Background job processing for handling email queues.
Getting Started
Prerequisites
Ruby 3.0
Rails 6.0 or higher
Installation
Clone the repository:
git clone https://github.com/greeenboi/RubyMassMailer.git
cd RubyMassMailer
Install the dependencies:
bundle install
Create and Fill the Enviroment file .env.example -> .env
Start the server:
rails s
Configuration
Within ./config/initializers/mailjet adjust the api v3.1 or v3.0 depending on whether you want to send batch mails or not (check your mailjet config)
Mailer Config
Configure the mailer settings in config/environments/production.rb:
Sending Emails
To send an email, make a POST request to the /api/v1/emails endpoint.
Sample JS script
constfs=require('fs');constpath=require('path');constaxios=require('axios');constFormData=require('form-data');constAPI_URL='http://localhost:3000/api/v1/emails';constRECIPIENT_EMAIL='coolman@email.com';// Replace with your test recipient emailconstATTACHMENT_PATH='./yummy.jpg';// Replace with the path to a test attachment fileasyncfunctionsendTestEmail(){try{constformData=newFormData();formData.append('email[to]',RECIPIENT_EMAIL);formData.append('email[to_name]','Test Recipient');formData.append('email[subject]','Test Email from Demo Server');formData.append('email[text_content]','This is a test email sent from our demo server.');formData.append('email[html_content]','<h1>Test Email</h1><p>This is a <strong>test email</strong> sent from our demo server.</p>');// Add attachment if the file existsif(fs.existsSync(ATTACHMENT_PATH)){constattachment=fs.createReadStream(ATTACHMENT_PATH);formData.append('email[attachments][]',attachment,path.basename(ATTACHMENT_PATH));}constresponse=awaitaxios.post(API_URL,formData,{headers: {
...formData.getHeaders(),},});console.log('Response Status:',response.status);console.log('Response Data:',response.data);}catch(error){console.error('Error sending email:',error.response ? error.response.data : error.message);}}sendTestEmail();
Contributing
We will open this soon.
License
This project is licensed under the MIT License – see the LICENSE file for details.
This is a Javascript package for the Attack-Modifier of the boardgame Gloomhaven.
For this purpose each modifier card and each modifier deck is explicitely implemented.
This package includes a corresponding .png file for every single card.
Features
The features folder contains the source code and pictures.
Cards
Create every base modifier card
Create every class modifier card
Decks
Create player and monster modifier decks
Create every class modifier deck
Add or remove cards from the deck
Shuffle the deck
Draw a card from a deck with a given value
Draw with advantage/disadvantage
Look at the top X cards
Look at the top X cards and put them back in any order
Apply perks of a class
Tests
The __ tests __ folder contains the tests for the implemented features.
Every implemented feature was tested seperately as well as within joined cases.
All implemented cards
All implemented decks and methods
Examples
// Create a cardconstplusTwo=newPlusTwo// Apply card modifier to a valueplusTwo.modifier(3)==5// Create a deckvardeck=newDeck// Add a card to the deck (i.e. +2 card)deck.addCard(plusTwo)// Draw a card with a value (i.e. 4)deck.draw(4)// Modifier after drawingdeck.modifier==4// Value after drawingdeck.value==6// Special after drawingdeck.special=[]
Navigate to the repository and create virtual environment and activate it using the following commands:
python -m venv ${YOUR_ENV_NAME}source${YOUR_ENV_NAME}/bin/activate # For Linux
You can replace ${YOUR_ENV_NAME} with the name you want to give to your virtual environment.
Install the required packages using the following command:
pip install -r requirements.txt
After those steps, you should be able to run the Notebooks.
Usage
Ergast Developer API
The Ergast Developer API. is used to get the data for this project. It is an experimental web service which provides a historical record of motor racing data for non-commercial purposes.
Generate the Data
To generate the data files formula1-circuits.json and formula1-data.json, you need to run the Notebook DataF1-ErgastAPI.ipynb which will generate the data in their corresponding folder. Those data will be used in the analysis and visualization Notebooks.
The data file formula1-circuits.json will contain the following information about the circuits based on the CIRCUIT_ID :
Circuit : The name of the circuit.
Country : The country where the circuit is located.
the data file formula1-data.json will contain global information regarding Formula 1. It contains the racing information based on the YEAR:
Drivers : Information about the drivers including their full name, birthdate and nationality.
Constructors : Information about the constructors including their name and nationality.
Circuits : Information about the circuits including their id, name and the date.
Laps : Information about the laps including for each lap all the drivers position and time. The laps are not available for every year (most unlikely to be available for the early years).
Results : Information about the results for each race including the driver, construction, grid position, final position, time, fastest lap and fastest lap ranking. The time of the driver is based on the time of the winner of the race (for instance D1 finished first in 1h30m00s and D2 finished second in 1h30m10s, D2 will have a time of +10s). Here also the availability of the fastest lap is not guaranteed for every year.
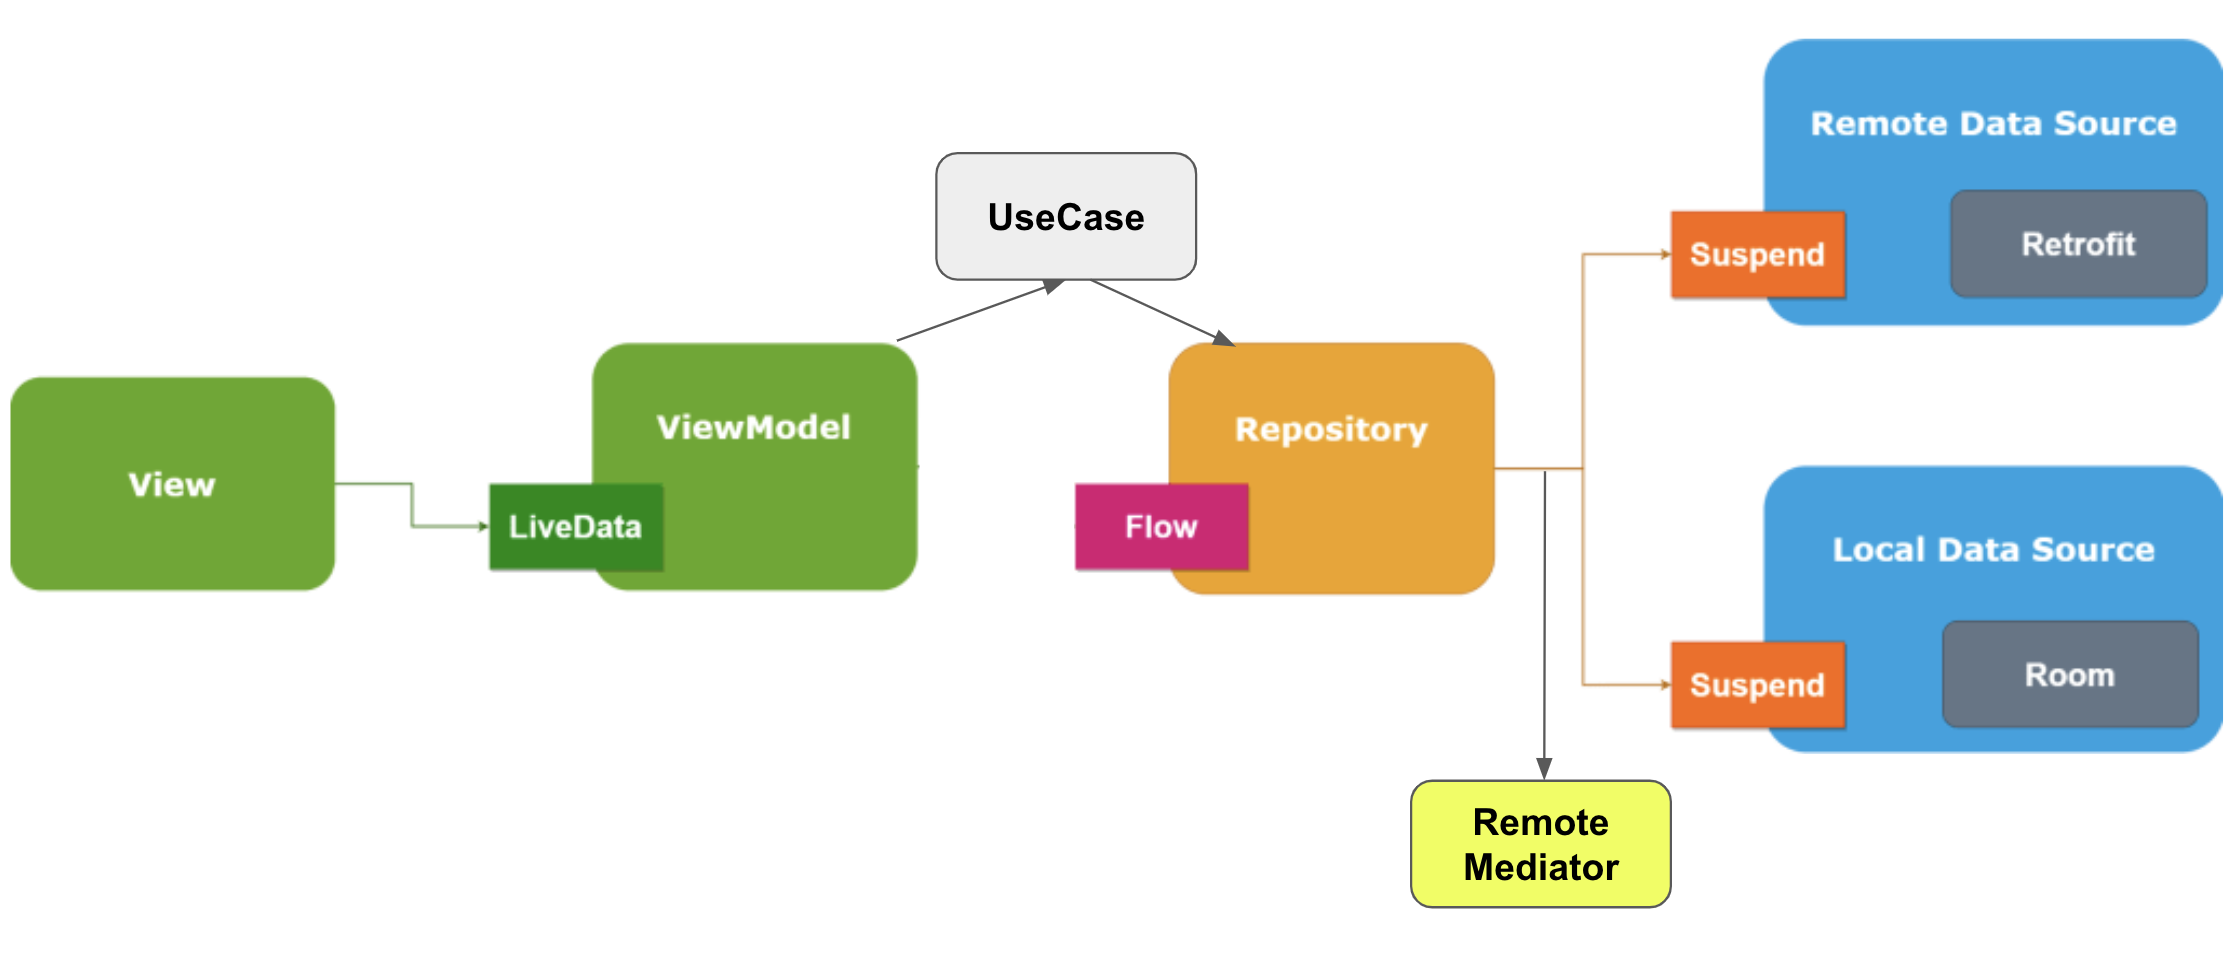
Welcome to TheMovie, an Android application that utilizes the JSONPlaceholder Database to retrieve posts and their comments, providing a social media app-like experience.
What’s included
An Android app with modular architecture and MVVM architectural pattern.
Furthermore, some libraries and frameworks such as:
Splash screen api and container HomeActivity.
Network connectivity interceptor for HTTP requests.
Hilt for dependencies injection.
Room for local storage.
Retrofit2 for API requests.
Paging3 for local & remote data pagination.
RemoteMediator for pagination orchestration.
Coroutines and Flow for Reactive Functional Programming.
StateFlow and SharedFlow for observing and updating data.
ViewBinding for activities and fragments.
Timber for logging purposes.
Android Studio EditorConfig file to maintain consistent coding styles.
Gradle’s Kotlin DSL.
SonarCloud for static code analysis.
SonarQube configuration files.
JaCoCo maven plugin to generate test coverage reports.
ktlint for static code analysis.
LeakCanary for memory leaks detection.
dokka for Kotlin’s documentation generation.
To summarize, every technology mentioned above was included in this project in order to meet the following requirements:
Load posts from JSON API, using both _start and _limit query parameters to support pagination (e.g. jsonplaceholder.typicode.com/posts?_start=0&_limit=10).
Show up swipe-to-options feature in posts recycler view items, allowing both delete a post and mark a post as favorite.
Favorite posts are shown up at the top of the list.
When a favorite post is unmarked as favorite, it returns to its previous position in the list.
Favorite posts have a star indicator.
Delete all posts in posts list except from the favorite ones using a floating button.
Fetching posts from JSON API when pull-to-refresh.
Post details screen is opened up when a post is tapped.
Delete a post and mark a post as favorite in post details screen.
Show up post, author, and comments data in post details screen.
App is able to work offline, loading both posts lists and posts details from local database.
Supporting landscape mode without losing screens’ state.
Installation
Clone this repository and import it into Android Studio
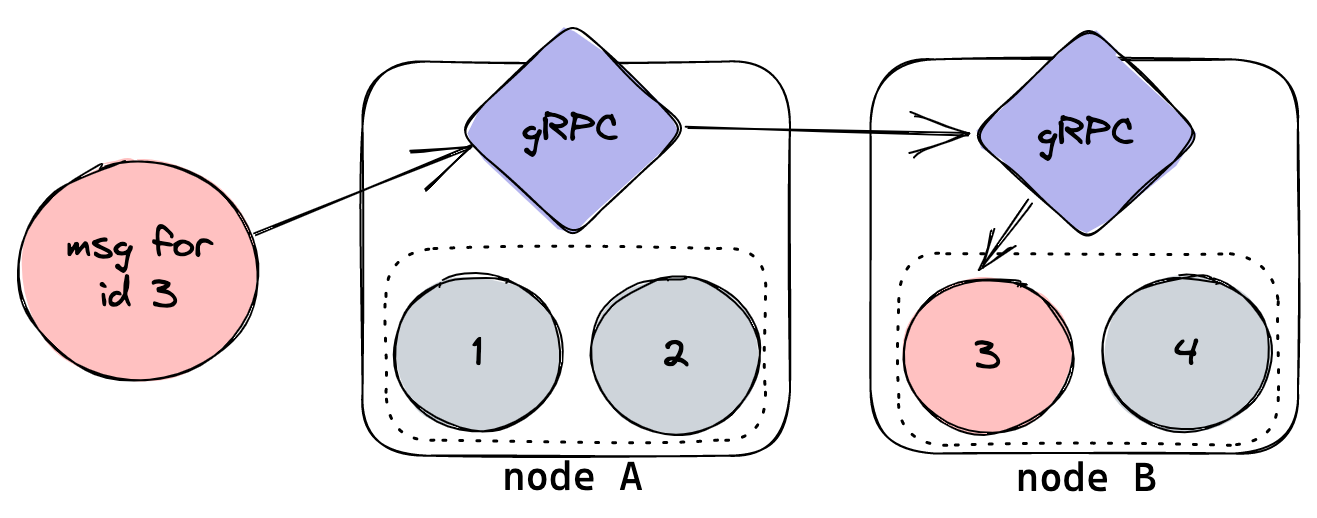
Parti provides a simple, partitioned messaging framework across a cluster of nodes. Send a message for a given partition to any node in the cluster, and the message will be forwarded to the node that owns that partition. The cluster will automatically rebalance as nodes are added and removed. Under the hood, Parti uses hashicorp/raft to distribute work and manage membership.
SAMPLE
# run node 1
make run1
# run node 2 (in another terminal)
make run2
# run node 3 (in another terminal)
make run3
# observe the partitions by asking node 1
go run ./client stats --addr 0.0.0.0:50101
# ping a partition from a given node
go run ./client ping --addr 0.0.0.0:50101 --partition 0
go run ./client ping --addr 0.0.0.0:50101 --partition 9
# send a message to various partitions and observe it forward# curl 'localhost:50001/send?partition=9&message=msg2'
go run ./example send --partition 0 --addr 0.0.0.0:50001 hello world
# curl 'localhost:50001/send?partition=1&message=msg1'
go run ./example send --partition 9 --addr 0.0.0.0:50001 hello world
Proposed rebalance procedure
tell all nodes the pause the partition
confirm with prior owner that they have shut down (or confirm they are dead and not in the cluster)
inform all nodes of the new owner and that it’s started
“Quote-Generator is a website created using HTML, CSS, and JavaScript. This website is dedicated to generating quotes on demand, utilizing a Quotes API. I’m actively managing this project on GitHub and using Git for version control. Webpack is employed to streamline the build process, and code linters are in place to catch and rectify code errors. Feel free to explore the live demo provided in the README! 😊”
A program that sorts files based on various attributes from the windows context menu. Simply install the program and your context menu will have an added Sort Files entry.
Nothing complicated, it gets the job done.
What is the context menu?
The context menu is the option menu created from right clicking, such as:
Installation
Install from PyPI
First, install the pip package
pipinstallfreshen-sorter
Install the dependencies:
pipinstallpyyamlpipinstallcontext_menu
and run the following command to install to the context menu.
Unzip the folder to a location where it won’t be moved.
Run the reginstall.py file
Usage
Made to be simple! No complicated command lines needed.
Install the required files.
Right click on the background of any Directory
Go to the Sort Files option and selected the desired organizer.
Organizers
There are four different options to organize files.
Sort by File Type
Probably the most useful organizer. Sorts each file into a folder based on the config/filegroups.yml file. The file already comes with the most common file extensions for each type of file(pictures, videos, etc.)
filegroups.yml
As mentioned earlier, the Sort by File Type uses the filegroups.yml to determine organization. This file can be manually changed to change the desired output, and the organization is quite straightforward.
You can either change the filegroups.yml file in the src directory and use the files built from the src folder, or if you already have the built files you can directly change the file in the dist directory. The context menu reads the file every time it is ran, so it will instantly update.
Sort by extension
Quite straightforward. Sorts each file into folders exclusively based on their extension.
Sort by Date
The only option that uses a cascading context menu(nested menus).
Sorts each file by the DATE MODIFIED attribute of the file. Has three options:
Day
Sorts up to the Day modified. Takes into account the year, month, and day.
Sorts up to the Month modified. Takes into account the year and month.
shortcuts├──_2019-05└──_2019-06
Year
Sorts up to the Year modified. Takes into account only the year.
‘
shortcuts└──_2019
Uproot Files
The only option that isn’t actually a sort. Recursively moves every file of every subdirectory from the current location to the current location. Useful for getting rid of unnecessary folders and flattening out a directory. For example:
BE VERY CAREFUL USING THIS! It is easy to permanently ruin a directory or files, especially if something relies on a specific folder tree, for example the windows directory.
Extra Information
If you are working with the source files do NOT move the files after running reginstall.py as it might cause the code to be unstable. The registry points to the absolute path of the files when installed and does not update.
Files shouldn’t be deleted or corrupted, as they haven’t through all my testing so far. But keep in mind anything is possible, and if you data is THAT important you should probably back it up somewhere. Keep in mind I am NOT responsible for any damages that may arise from this program. Use it at your own risk.
I also created some articles about this project! Check them out:


 https://github.com/AhmedManan/Arduino-UNO-based-fingerprint-sensor-interface