Hello! I wanted to share some of my work starting today! You will learn how to create a simple dialogue system with Unity Coroutines and ScriptableObjects.
Using ScriptableObject
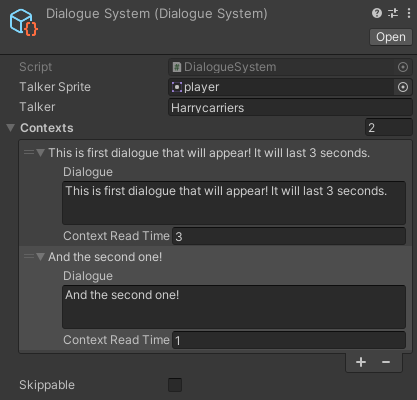
Create a ScriptableObject on Project folder using Create > ScriptableObjects > DialogueSystem
Script side
Make it single system:
// Make sure to drag the scriptable object here![SerializeField]privateDialogueSystemdialogueSystem;//...voidStart(){StartCoroutine(StartDialogue);}privateIEnumeratorStartDialogue(){// Get first dialogvarfirstDialog=dialogueSystem.contexts[0].dialogue;// Or loop throughfor(inti=0;i<dialogueSystem.contexts.length;i++){vardialogue=dialogueSystem.contexts[i].dialogue;yieldreturnnewWaitForSeconds(dialogueSystem.contexts[i].contextReadTime);}// ...}
Or if you want to create sequences, make it an array:
[SerializeField]privateDialogueSystem[]dialogueSystems;//...intcurrentSequence=0;voidStart(){StartCoroutine(StartDialogue());}privateIEnumeratorStartDialogue(){// Get sprite for talking personvartalkerSprite=dialogueSystem[currentSequence].talkerSprite;// Loop throughfor(inti=0;i<dialogueSystem[currentSequence].contexts.length;i++){vardialogue=dialogueSystem[currentSequence].contexts[i].dialogue;yieldreturnnewWaitForSeconds(dialogueSystem[currentSequence].contexts[i].contextReadTime);}// ...}
If you want to divide sprites for each dialogue, simply move public Sprite talkerSprite inside Context class.
This is the UDP bridge as such, it is executed like next example: $node ./tunnel/app.js -s 0.0.0.0:5000 -c 0.0.0.0:4000 -t 500 -e 100
Where: -s: means server-tunnel endpoint to listening to streamer, default value if omit 0.0.0.0:5000.
-c: means server-tunnel endpoint to listening to client, default value if omit 0.0.0.0:4000.
-t: means time to expire cache data in miliseconds, default value if omit 500 ms.
-e: means interval time to send all cache available to clients connected, default if omit 100 ms.
Client:
This is the client which will get the cache data from server, execute as: $node ./client/app.js -s 127.0.0.1:4000 -k 30 -i 1234.
Where: -s: means server-tunnel endpoint which is listening to the client, especial attention to port parameter, it has to be the same as the tunnel has for this client, default if omit 127.0.0.1:4000.
-k: means time interval in miliseconds to send keepalive message to the tunnel, default if omit 1000 ms.
-i: means a unique id amount all client connected to the server-tunnel, it is a way to identify the client no matter if he changed its endpoint through NAT/PAT, it could be any string.
Streamer:
This is a mock streamer, used to test but can be used in production if you want, example: $node ./streamer/app.js -s 127.0.0.1:5000 -t 100
Where:
-s: means server-tunnel endpoint which is listening to the streamer, especial attention to port parameter, it has to be the same as the tunnel has for the streamer, default if omit 127.0.0.1:5000.
-t: means time interval to send mocked cache data to server, defautl if omit 100 ms.
Quick localhost running:
As can be noted default values match with each others, so only execute following commands in differents terminal and enjoy:
Feel free to modify, use and improve this first approach.
Currently the client is sending a json {id: [-id parameter], data: "k"} as keepalive message and the mock streamer is sending the string "Hello" as cahce info.
There is no a real concept of connection or server-client protocol in UDP-style sockets, in this application the clients connected will be concidered who have sent a keepalive before, it’ll be identified inside the server-tunnel by the id set in scripts parameters, if there are ids repeated the last keepalive will be got as current connected client for that id, be sure set diferents id parameters for diferents clients.
All line in the project preceded by a "//DEBUG" comment can be deleted or commented.
This Spring Boot project demonstrates web and method security using
ct-iam-spring-security.
This repository is only available to sponsors (Anbu level).
How it Works
Maven Dependency
This module is available in GitHub and can be added to your Maven project as a dependency.
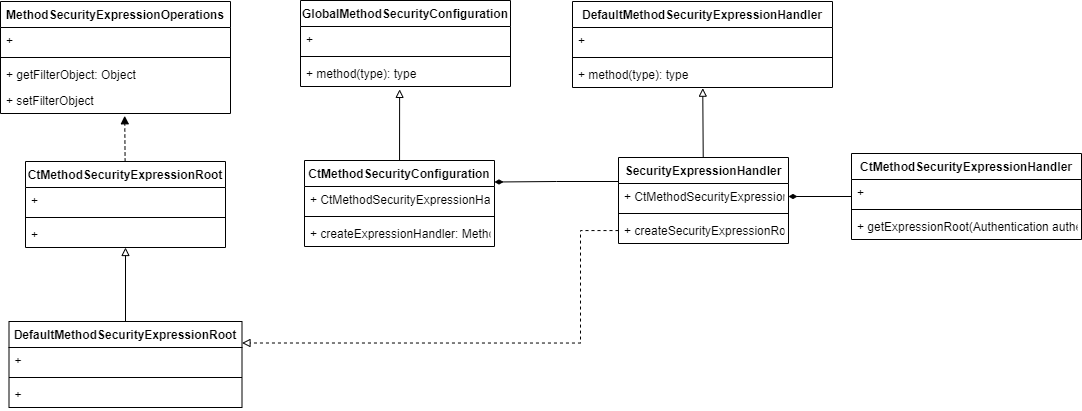
To enable the web and method security in your microservice. Create a new Java class CtAppSecurityConfiguration and
annotate it with EnableCtSecurity. In this class, we define the custom beans that generates the HttpSecurity and add it
to the filter chain as well as the custom method security expression handler.
@Configuration
@RequiredArgsConstructor
@EnableCtSecurity
public class CtAppSecurityConfiguration {

  @Bean
  public CtHttpSecurityConfigurer httpSecurityConfig() {

    return http ->
        http
            .authorizeHttpRequests(authz -> authz
                .antMatchers(HttpMethod.GET, "/actuator/**").permitAll()
                .antMatchers("/api/**").authenticated()
                .anyRequest().permitAll()
            );
  }

  @Bean
  public CtMethodSecurityExpressionHandlerFactory methodSecurityFactory() {
    return CtAppMethodSecurityExpressionRoot::new;
  }
}
In CtWebSecurityConfiguration:
@Configuration
@EnableWebSecurity
@RequiredArgsConstructor
public class CtWebSecurityConfiguration {

  private final CtHttpSecurityConfigurer httpSecurityConfig;

  @Bean
  public SecurityFilterChain filterChain(HttpSecurity http) throws Exception {

    http.csrf().disable()
        .cors()

        .and()
        .sessionManagement()
        .sessionCreationPolicy(SessionCreationPolicy.STATELESS)
        .sessionAuthenticationStrategy(new NullAuthenticatedSessionStrategy())

        .and()
        .httpBasic().disable()
        .formLogin().disable()
        .oauth2ResourceServer().jwt();

    httpSecurityConfig.configure(http);

    return http.build();
  }
}
Class Diagram
Method Security
Testing
I have created this Spring Boot project that use this library available at
https://github.com/czetsuya/ct-aws-cognito-spring-security. This project contains the Security configuration, custom
method expression handler, and sample controllers.
/hello – This endpoint is not secured, therefore it is available even without an authenticated token.
/api/testing/authenticated – This endpoint needs an authenticated user.
/api/testing/authorized – This endpoint needs an authenticated user and performs the validation in.
CtAppMethodSecurityExpressionExtension.isAuthorized which return a hard-coded true. Thus, it should be accessible.
/api/testing/unauthorized – This endpoint needs an authenticated user and performs the validation in
CtAppMethodSecurityExpressionExtension.isUnAuthorized which return a hard-coded false. Thus, it should not be
accessible.
You can add custom authorization rules in CtAppMethodSecurityExpressionExtension, and it will be automatically added to
the Spring security context.
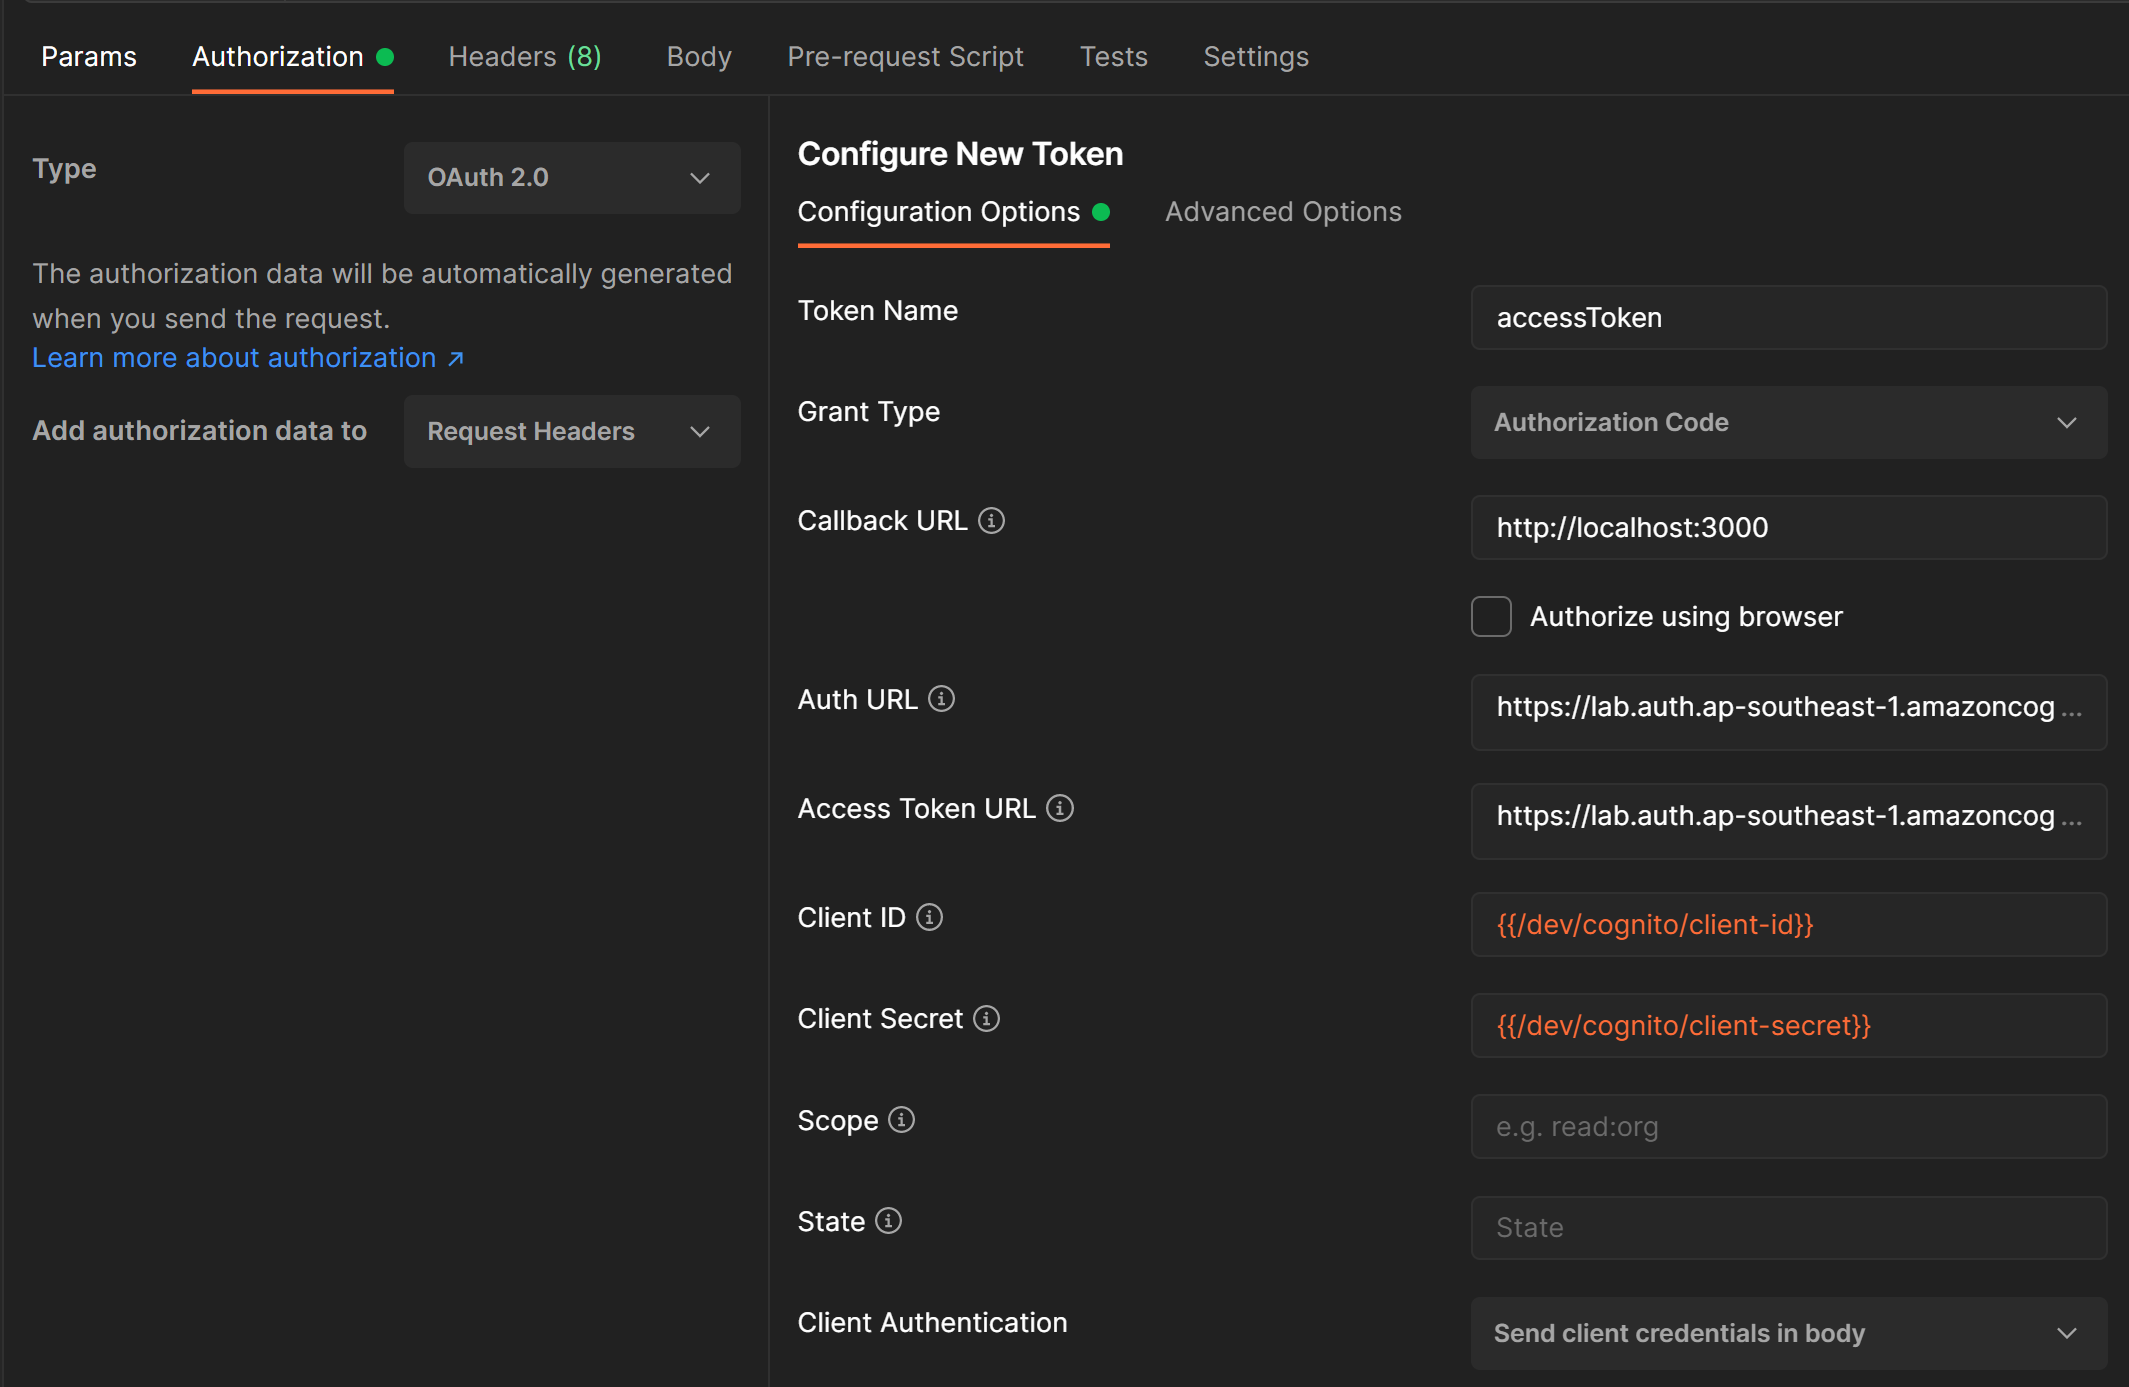
Postman
Get a Token
To get a token, create a new request in Postman and under the authorization tab, fill-up the “Configure New Token” tab.
Click the Get New Access Token and enter a valid credential.
WebSocket server with tags management, forward messages on the right clients with ease !
Introduction
The Gomoob WebSocket server is a simple Ratchet server which works with custom tags
to easily forward messages to clients depending on custom tags.
As an example let’s suppose we have a Web Application with English and French users. English users should receive
English messages, French users should receive French messages.
Each application opens a Web Socket with a particular language tag.
// Web Application in English modevarenWebSocket=newWebSocket('ws://localhost:8080?tags={"language":"EN}');
...
// Web Application in French modevarfrWebSocket=newWebSocket('ws://localhost:8080?tags={"language":"FR}');
...
On server side the Gomoob WebSocket server keeps track of the associations between tags and WebSocket connections. For
example this simple PHP peace of code allows to easily forward a message to all clients connected with the language=FR tag.
// PHP Server (in most cases a Web Server) to Web Socket server client, allows to send one message which is forwared to// several opened WebSocket connections$phpClient = newWebSocketClient('ws://localhost:8080');
$phpClient->send(WebSocketRequest::create($message, ['language' => 'FR']);
Installation
Server side (run the server)
Running a server requires only one line of code.
require__DIR__ . '/vendor/autoload.php';
echo"WebSocket server started, enter Ctrl+C to stop server." . PHP_EOL;
\Gomoob\WebSocket\Server\WebSocketServer::factory()->run();
Client side (PHP)
First pull the project with composer using the following dependency.
Then simply use the \Gomoob\WebSocket\Client\WebSocketClient class to send your messages.
// Open a Server / Server WebSocket connection$phpClient = newWebSocketClient('ws://localhost:8080');
// Forward a message to all the WebSocket client connections associated to 'tag1' and 'tag2'$response = $phpClient->send(
WebSocketRequest::create(
$message,
[
'tag1' => 'tag1Value',
'tag2' => 'tag2Value'
]
)
);
If you want to write solid unit tests we also provide the \Gomoob\WebSocket\Client\WebSocketClientMock
class. This class is a utility mock which is very easy to use.
// Somewhere in our code we use a \Gomoob\WebSocket\IWebSocketClient ...// We suppose this code is implemented in MyPowerfulService->serviceMethod();$phpClient->send(WebSocketRequest::create('Message 0.')->setTags(['tag0' => 'tag0Value']));
$phpClient->send(WebSocketRequest::create('Message 1.')->setTags(['tag1' => 'tag0Value']));
$phpClient->send(WebSocketRequest::create('Message 2.')->setTags(['tag0' => 'tag0Value', 'tag1' => 'tag1Value']));
// Then we write a test case by replacing the real WebSocket client implementation with the mock oneclass SampleTestCase extends TestCase
{
publicfunctionsetUp() {
$this->webSocketClient = newWebSocketClientMock();
$this->myPowerfulService->setWebSocketClient($this->webSocketClient);
}
publicfunctiontestServiceMethod() {
// Calls the method to test$this->myPowerfulService->serviceMethod();
// Checks the right requests were sent$webSocketRequests = $this->webSocketClient->findByTags(['tag0' => 'tag0Value']);
$this->assertCount(2, $webSocketRequests);
$this->assertContains($webSocketRequest0, $webSocketRequests);
$this->assertNotContains($webSocketRequest1, $webSocketRequests);
$this->assertContains($webSocketRequest2, $webSocketRequests);
}
}
Advanced configuration
The default behavior of the Gomoob WebSocket server is the following !
Expose port 8080 and authorize connections from all IP addresses (i.e 0.0.0.0) ;
Accept only plain string messages (exceptions are encountered if JSON messages are sent / received) ;
Use a default PSR logger which output messages on the terminal ;
Do not manage any authorization checks.
If one of those behaviors does not fit your need please read the following sub sections. You can also read the src/test/server.php file which shows how to start a server with custom message parsing and authorizations.
Message parser
By default the WebSocket server will accept plain string messages, if you try to send a JSON object then you’ll
encounter the following exception.
The 'message' property is not a string, you must configure a message parser to parse messages !
This is the expected behavior, if you want the server to manage custom PHP object messages then you have to :
Make your PHP object messages extends \JsonSerializable and implement the jsonSerialize() method
correctly ;
Implement a custom message parser to create your custom PHP object messages when a plain JSON object is received.
A sample message object is provided in the \Gomoob\WebSocket\Message\Message class, feel free to read the
associated source code to understand how it works. You’ll also found a sample message parser in the \Gomoob\WebSocket\Message\MessageParser.
To explain how to manage custom PHP object messages let’s suppose we have the following message object to send.
As this this will not work because on server side the Gomoob WebSocket server will not know how to parse the messages
and how to re-create those messages to forward them to clients who opened WebSocket connections.
The first thing to do is to implement the \JsonSerializable class and the jsonSerializeMethod() in our
MyMessage class.
By default the WebSocket server will accept all connections and message sendings, in most cases this behavior is not
expected because anybody could open a WebSocket on your server and try to forward messages to all connected clients
without authorization.
You can implement a custom authorization manager by implementing the \Gomoob\WebSocket\IAuthManager
interface, this interface has the following signature.
/** * Interface which defines an authorization manager. An authorization manager allows to control authorization while * opening Web Socket connections and sending messages over Web Sockets. * * @author Baptiste Gaillard (baptiste.gaillard@gomoob.com) */interface IAuthManager
{
/** * Function used to indicate if connection opening is authorized. * * @param \Ratchet\ConnectionInterface $connection the current Ratchet connection. * * @return boolean `true` if the connection opening is authorized, `false` otherwise. */publicfunctionauthorizeOpen(ConnectionInterface$connection);
/** * Function used to indicate if message sending is authorized. * * @param \Ratchet\ConnectionInterface $connection the current Ratchet connection. * @param \Gomoob\WebSocket\IWebSocketRequest $webSocketRequest the current Gomoob WebSocket request. */publicfunctionauthorizeSend(ConnectionInterface$connection, IWebSocketRequest$webSocketRequest);
}
So its very easy to manage authorizations, just return true or false with the authorizeOpen(...) or
authorizeSend(...) functions.
The ApplicationsAuthManager
To easier authorization we provide an authorization manager which allows to declare several applications with key
and secret properties.
This authorization manager is available in the \Gomoob\WebSocket\Auth\ApplicationsAuthManager class, it
works with a very simple YAML configuration file.
Here is a sample instanciation of the manager with a WebSocket server.
Then the followig Javascript peace of code will apply.
// Does not work because required 'key' and 'secret' URL parameters are not providedvarsocket1=newWebSocket('wss://myserver.org:8080');// Works because the 'key' and 'secret' URL parameters provided are validvarsocket2=newWebSocket('wss://myserver.ord:8080?key=application1&secret=B4ajW3P7jfWEYPZsQV8mnteHg97G67uW');// Does not work because the request does not provide the 'key' and 'secret' propertiessocket2.send(JSON.stringify({message : {messageProperty1 : "Hello !"}}));// Works because the request provides valid 'key' and 'secret' propertiessocket2.send(JSON.stringify({message : {messageProperty1 : "Hello !"},metadata : {key : 'application2',secret : '33yLWdynhaqm9tYjDFKf8gB8zmAPKdDP'}}));
The same rules are also applicable with the PHP client we provide.
Moves the TagsTree class to \Gomoob\WebSocket\Util\TagsTree ;
Add a new TagsTree->reset() method ;
Add a new \Gomoob\WebSocket\Client\WebSocketClientMock class to easier unit testing ;
Update composer dependencies.
1.1.0 (2016-08-18)
Add more PHP Documentor documentation about the goals of metadata in
the \Gomoob\WebSocket\IWebSocketRequest interface and the
\Gomoob\WebSocket\Request\WebSocketRequest class ;
Add management of defaultMetadata in the \Gomoob\WebSoscket\IWebSocketClient interface and the
\Gomoob\WebSocket\Client\WebSocketClient class ;
Add management of defaultTags in the \Gomoob\WebSocket\IWebSocketClient interface and the
\Gomoob\WebSocket\Client\WebSocketClient class ;
Now all the factory methods can be calls with a factory(...) method or an alias create(...) method.
1.0.3 (2016-08-17)
Fix port and address options problems while creating a WebSocketServer, the parameter were not
transmitted to the Ratchet server ;
Now the default port number is 80 which is the default Ratchet server port.
1.0.2 (2016-08-17)
Add missing symfony/yaml composer dependency, otherwise problems was encountered while running
composer update --no-dev ;
Add missing monolog/monolog composer dependency, , otherwise problems was encountered while running
composer update --no-dev.
1.0.1 (2016-08-17)
Configure specific Eclipse validator rules ;
Add MIT license.
1.0.0 (2016-08-17)
First release.
About Gomoob
At Gomoob we build high quality software with awesome Open Source frameworks everyday. Would
you like to start your next project with us? That’s great! Give us a call or send us an email and we will get back to
you as soon as possible !
You can contact us by email at contact@gomoob.com or by phone number
(+33) 6 85 12 81 26 or (+33) 6 28 35 04 49.
This repository contains some of the resources developed by REACTION (Retrieval, Extraction and Aggregation Computing Technology for Integrating and Organizing News) an initiative for developing a computational journalism platform (mostly) for Portuguese.
Tracking politics with POWER Silvio Moreira, David S Batista, Paula Carvalho, Francisco M Couto, and Mario J Silva. In Program: electronic library and information systems, 47(2), 2013.
POWER – Politics Ontology for Web Entity Retrieval Silvio Moreira, David Batista, Paula Carvalho, Francisco M Couto, and Mário J Silva. In Advanced Information Systems Engineering Workshops. Springer, 2011.
Description: a corpus of semantic relationships extracted from the Portuguese Wikpedia and DBpedia.
Cite: Exploring DBpedia and Wikipedia for Portuguese Semantic Relationship Extraction
David Soares Batista, David Forte, Rui Silva, Bruno Martins, and Mário J. Silva.Linguamática, 5(1), 2013.
Parliamentary Data
Data crawled by Bruno Martins from the Italian Senate and the Portuguese Parliament
Others
DBpediaEntities-PT: corpus of entities extracted from the Portuguese DBpedia.
Gembot is an advanced AI-powered chatbot designed to engage users in natural language conversations using state-of-the-art machine learning models. Built on top of the Gemini architecture, it supports features such as summarization, streaming responses, and custom dialogue management.
Features
💬 Natural language understanding: Responds to user queries with contextual understanding.
🔄 Real-time conversation: Supports asynchronous and real-time chat interactions.
📜 Summarization: Can summarize text passages dynamically.
🌐 Web Integration: Can be deployed and integrated into web applications easily.
📈 Scalable: Built for both lightweight personal projects and large-scale implementations.
This github repository has a set of simple makefiles that may be useful for small or medium sized C and C++
projects without any further build system. The scripts build executable targets from c-, c++- and
assembler source files in the current project directory and create a JSON Compilation Database for
the clang language server.
These makefiles only use functions that are available in a standard GNU Linux installation and do
not require any additional build tools to be installed. They are therefore ideally suited to get a
quick introduction to the C/C++ world.
Together with an editor that can use the capabilities of the Clang language server, it is possible to
support code completion and code navigation in the best possible and interactive way.
An interactive project wizard allows a convenient and quick creation of the project skeleton for 5
different project types.
The project wizard can generate artifacts for full integration into the Kate Editor build plugin.
Make automatically determines which pieces of a program need to be recompiled, and issues commands
to recompile them. For maximum performance, all make scripts support parallel build.
The scripts keeps track of the last used configuration and perform a complete build, if changes in
the build configuration have been detected.
The scripts come with a comprehensive set of warning compiler options for the GNU C++ compiler and clang.
These options can be controlled in 6 levels.
All make files support 2 build modes run and debug. In build mode run an optimized executable without
debug information is built. In build mode debug the executable contains debug information.
All compiler options are valid for GNU C++ compiler and clang, if you use an alternative compiler
adapt the options and warning flags accordingly.
Project Types
One To One: C++ project – Build executable targets from each %.cpp and %.cc source file in the project directory.
In Place Build: C++ project – Build one executable from all %.cpp and %.cc source files in the project directory.
Out Place Build: C++ project – Build one executable from all %.cpp and %.cc source files in all project source directories.
Out Place Build: C project – Build one executable from all %.c source files in all project source directories.
Out Place Build: C/C++ project – Build one executable from all C++, C and assembler source files in all project source directories.
Installation
You can execute this tool directly from the cloned/downloaded source-repository or you can install the tool.
If you want to install the tool, download the installation script of the latest release Releases
and run it. The release package is a self extracting script. Execute it and follow the instructions on the screen.
You can install the tool into an arbitrary place. The preferred way is to run this script as root user
and to install the tool into a system directory.
The default installation place for the root user is /usr/local
The default installation place for other users is ~/mktsimple
Quick Start
After installation you can start the project wizard mktsimple from your installation directory.
Follow the instructions and select the option ‘Create a hello world project’.
Then open the created project directory in a shell and execute make all.
To find out more about the possible options of the tool execute make help
If the tool is not installed in the default location (/usr/local) and the project has no local copy
of the warning.xxx.mk files it is necessary to add the option -I with the path to the include directory
of your installation e. g.: make -I ~/mktsimple/include
Samples
Samples are available in the source repository.
The directories
OneToOne
ProjectInPlaceBuild
ProjectOutPlaceBuildCpp
ProjectOutPlaceBuildC
ProjectOutPlaceBuild
contain sample projects.
Use the following commands to complete these project fragments withe the project wizard:
cd OneToOne; ../bin/mktsimple --project-dir . --type otocpp --noprompt --overwrite; make all

cd ProjectInPlaceBuild; ../bin/mktsimple --project-dir . --type ipbcpp --noprompt --overwrite; make all

cd ProjectOutPlaceBuildCpp; ../bin/mktsimple --project-dir . --type opbcpp --noprompt --overwrite; make all

cd ProjectOutPlaceBuildC; ../bin/mktsimple --project-dir . --type opbc --noprompt --overwrite; make all

cd ProjectOutPlaceBuild; ../bin/mktsimple --project-dir . --type opb --noprompt --overwrite; make all
Kate integration
The Build Utility provides files that allow you to take full advantage of the Clang Language Server with
the Kate Editor.
To do this, you need to install the following plugins in ‘Kate’:
Build & Run,
LSP Client,
Project Plugin,
Terminal
When creating a new project skeleton with the project wizard ‘mktsimple’, activate the option:
‘Create a Kate Project’. The project wizard can also be used to add the Kate-Project-File to an existing
C/C++ project.
The first build attempt creates the compilation database that is needed by the Language Server, even
if the build itself fails. From now on, all the functions of the Language Server are available.
If you have any suggestions or bug reports please write a Github Issue.
Schema definition for vendors to advertise their binaries
adoptium-marketplace-client
Client library for reading a repository with vendor data
adoptium-marketplace-server
Implementation of the adoptium marketplace API
exampleRepositories
Examples of a vendor repository
Build
Build with
./mvnw clean install
Testing
Tests rely on the data inside the exampleRepositories directory in order for tests to pass they must be signed. If you wish to modify test assets they need to be re-signed once they have been modified. The procedure would be as follows:
Generate test keys
Look in the exampleRepositories/keys directory for scripts that detail generating keys
Re-sign assets
Run SignTestAssets in the adoptium-marketplace-utils project.
Repository validation
A repository can be validated using the MarketplaceClient. The client pulls a repository and validates its contents. For example:
Note that in this example we have used the default SignatureType.BASE64_ENCODED which specifies that the signature files are
base64 encoded. If you require non-base64 encoded use SignatureType.SIG.
An example of running this can be seen in RepoTest class in the adoptium-marketplace-client module. To validate your repo using this test,
edit it to add your public key and repo location, then run with:
VALIDATE_REPO=true ../mvnw test -Dtest=RepoTest#validateRepo
from inside the adoptium-marketplace-client directory.


 https://github.com/harrycarriers/dialogue-system