For the Moneycontrol Budget Hackabot Challenge, we developed a web based chat-bot to address
the second problem statement which is the ‘Gamification for Personal Finance’. There are two parts of the problem and in this README we also highlight the approaches we used to solve them. You can view the web-based bot: https://pihackabot.mybluemix.net.
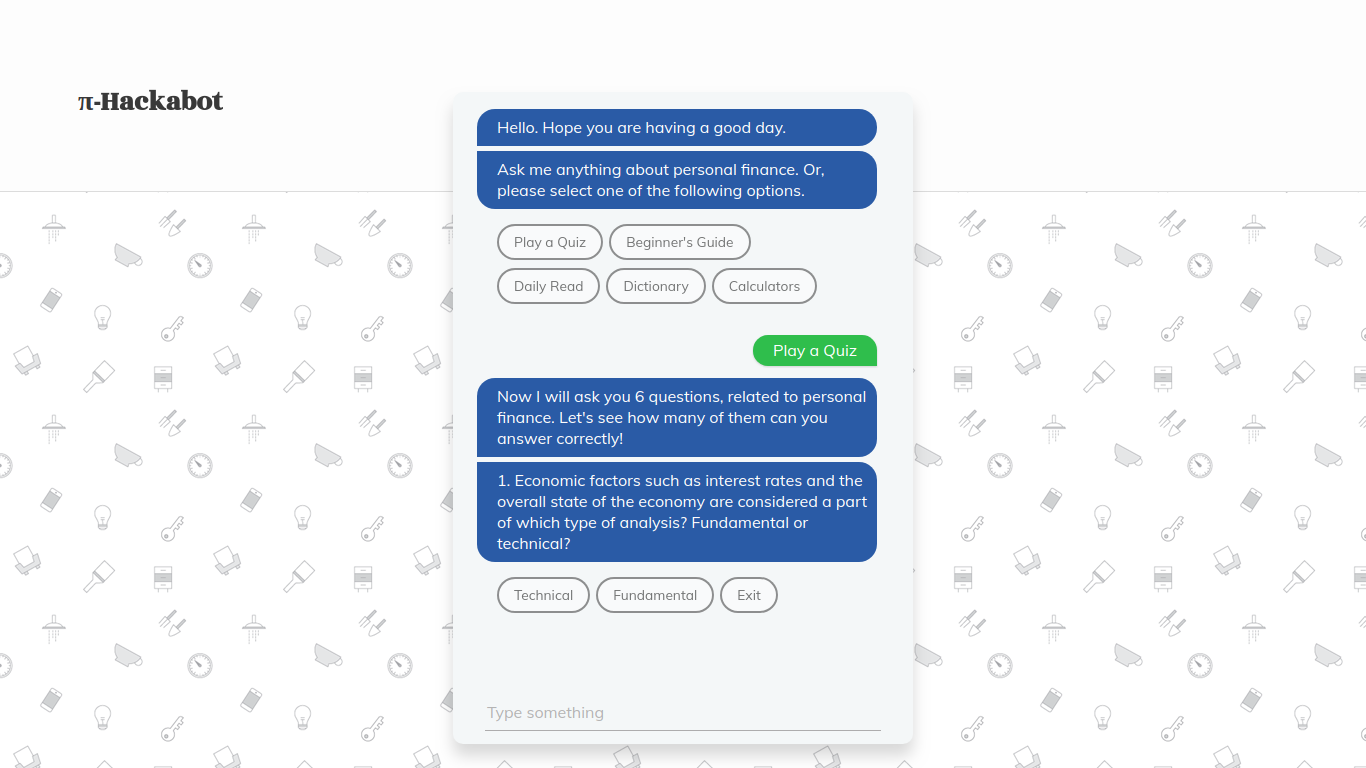
1. Features (Part I of Problem II)
Quiz – to put the financial knowledge of the user to test.
FAQs – for users to obtain knowledge of basic as well as advanced concepts.
Daily Read Subscription – Recommends a Moneycontrol.com article everyday to the user.
Calculators – built in with various calculators (such as EMI, Crorepati Calculator, Asset Allocator, Gratuity Calculator, etc)
2. Predictor (Part II of Problem II)
The predictor is built on a Linear Regression model. The features we are taking into
consideration are the stock’s 1. Opening Price 2. Day’s High, and 3. Day’s Low to predict the closing price, which in turn serves as a measure to consider buying or selling the asset. The Jupyter Notebook can be found in ./predictor containing main.ipynb and the TSLA.csv which we used to train the model.
Tech Stack
Served via IBM Bluemix
Built using IBM Watson Conversation Service
Data/Resource via Moneycontrol.com & Investopedia.com
TSLA 6 mo dataset via Yahoo! Finance
Local Installation
Clone the repository to run the package into the local Node.js runtime environment:
SCAMP (Suite for Computer-Assisted Music in Python)
SCAMP is an computer-assisted composition framework in Python designed to act as a hub, flexibly connecting the
composer-programmer to a wide variety of resources for playback and notation. SCAMP allows the user to
manage the flow of musical time, play notes either using FluidSynth or via MIDI or OSC messages
to an external synthesizer, and ultimately quantize and export the result to music notation in the form of MusicXML or Lilypond.
Overall, the framework aims to address pervasive technical challenges while imposing as little as possible on the aesthetic choices
of the composer-programmer.
Features
Flexible and extensible playback: Although SCAMP comes with a basic general MIDI soundfont,
any .sf2 or .sf3 soundfont can be used, and playback can also include MIDI or OSC messages to external
programs or synthesizers, which effectively offers limitless sonic possibilities.
Note-based, but in a broad sense: Although SCAMP conceives of music in terms of notes, notes in
SCAMP are extremely flexible sound-objects that can include the continuous evolution of arbitrary
playback parameters.
Effortless microtonality: to play the G above middle C 30 cents sharp, the user has only
to use the MIDI pitch 67.3. Behind the scenes, SCAMP manages all the MIDI pitchbend
messages, placing notes on separate channels where necessary so that these messages do
not conflict.
Effortless playback of glissandi and dynamic envelopes. Both pitch and volume can follow
arbitrary curves defined using the expenvelope package.
Flexible and precise polyphonic tempo control using clockblocks.
In SCAMP, different layers of music moving at different tempi can be interwoven with one
another while remaining coordinated. Smooth accelerandi and ritardandi are possible, and the
resulting music can be quantized according to the tempo of any layer.
Sensible and flexible quantization. The user has a fine degree of control over how rhythms
are quantized and over the degree of complexity in the resulting notation.
Philosophy
Compositional tools always feature some degree of trade-off between functionality and freedom;
every feature that is made available to the user steers them in a certain direction. For
instance, if a framework provides abstractions for manipulating harmonies, the user may find
themselves (perhaps unconsciously) pushed in the direction of a particular harmonic language.
While this may be a worthwhile trade-off in many cases, it is not the goal of SCAMP. Here,
the goal is to provide general purpose tools, to remove the drudgery of implementing practical
functionality that is needed again and again. Beyond this scope, users are encouraged to write
and share their own extensions to suit their own compositional inclinations. (Several such
extensions are available in the scamp_extensions package.)
Other key values underlying this framework are:
Playback first, notation second: SCAMP has been designed so that the user interacts with an
ensemble, not a score. This way, ideas can be quickly auditioned and iterated over based on the
sonic result. Once the result is deemed satisfactory, the user can then export it as music notation.
Compact and expressive code: Efforts have been made to make user code simple, yet powerful.
One of the ways this is accomplished is through sensible defaults; although there is a lot of
functionality under the hood, it shouldn’t be encountered by the user until it is needed.
Modularity and adherence as much as possible to the Unix Philosophy.
SCAMP bundles a number of tools together for convenience, but it may be more than a given user
needs. For this reason, the MusicXML export capability is available separately as pymusicxml, the flexible musical Envelope
class is available separately as expenvelope,
and the system for managing musical time is available separately as clockblocks.
Installation & Requirements
On a properly configured computer, installing SCAMP is as simple as opening a terminal and
running:
pip3 install --user scamp
(This installs it for a single user. To install it for all users on a computer, use sudo pip3 install scamp and enter your administrator password.)
Each of these steps is described in greater detail below. After configuring the computer and
running pip3 install --user scamp, you should be able to test the installation by:
Opening a terminal and typing python3 to start an interactive python session.
Typing in from scamp import test_run; test_run.play() and pressing return.
If you here a piano gesture sweeping inward towards middle C, SCAMP has installed correctly!
You should be greeted with “Python 3.10” or something similar in response. If so, you’re all set!
If you get something like “command not found” instead, it’s likely that something went wrong in the process of installation.
Windows
As on a Mac, you can download and install Python 3 here: https://www.python.org/downloads/.
In the installer, be sure to select “Add Python 3.10 to PATH”. This allows you to invoke python from the Command Prompt
by typing either python or py, and this should also default to the latest version of python. Test that all went
according to plan by typing:
python --version
You should be greeted with “Python 3.10” or something similar in response. If so, you’re all set! For all other installation instructions below, use python instead of python3 and pip instead of pip3.
Linux
On Linux, Python 3.10 or greater is often already installed by default. Again, you can check this
by opening a terminal and running:
python3 --version
If your version of python is already 3.10 or greater, you’re good to go. However, if your version
of Python 3 is less than 3.10, you will have to install python 3.10 or higher, e.g. from a third
party PPA.
2) (Linux only) Installing FluidSynth
SCAMP requires FluidSynth for soundfont playback, but on both Mac and Windows — due to
the lack of a default package manager — it became clear that the path of least resistance was to
include the compiled FluidSynth library within the SCAMP package. For this reason, you don’t need to
take the step of installing FluidSynth to use SCAMP on Mac or Windows.
Since Linux distros have package managers, it makes more sense to have users take the extra
step to install FluidSynth that way. On apt-based distros like Debian and Ubuntu,
it’s as simple as running:
sudo apt install fluidsynth
You are now the proud owner of a FluidSynthesizer!
3) (Optional) Installing python-rtmidi
For midi input, and also to generate an outgoing midi stream (which could, for instance, be
routed to a DAW), you will need the python-rtmidi
library. You can get this by running from a terminal:
pip3 install --user python-rtmidi
On Linux, if you’re running into an error you may need to first install the python3-dev
package, for instance with the command:
sudo apt install python3-dev
For any other python-rtmidi installation woes, take a look at the installation instructions here.
4) (Optional) Installing abjad and LilyPond
For LilyPond output, you will need the abjad library. To do so,
run the following:
pip3 install abjad
Note that abjad sometimes changes in a way that breaks compatibility with SCAMP. If you are using a version of abjad
that is more recent than the one SCAMP was tested with, a warning will indicate this fact when you try to use
it to generate notation.
The scamp_extensions package is the place for models of music-theoretical concepts (e.g. scales, pitch-class sets),
additional conveniences for interacting with various types of input and output, and in general anything that builds
upon SCAMP but is outside of the scope of the main framework.
The easiest way to install scamp_extensions is by running the command:
pip3 install --user scamp_extensions
To install the most up-to-date version (assuming you have git installed), you can instead run:
2019 NBA Hackathon – Calculating Offensive & Defensive Ratings
Team 4PPP – Skyler Shi, Frank Li, Brandon Pollack, Faizan Abdullah
The PDF version of the writeup can be accessed here
This project was a first-round sprint project for the 2019 NBA hackathon. Given official NBA play-by-play data, we needed to calculate the offensive and defensive ratings for players per-game.
We were given data to 82 games in data/Play_by_Play.txt to process, but our script is generalizable to any game.
Understanding Offensive & Defensive Ratings
We calculated the offensive rating for each player with this formula:
Off-rating = (points scored by team while on court) / (offensive possessions involved in) * 100
and we calculated the defensive rating with this formula:
Def-rating = (points allowed by team while on court) / (defensive possessions involved in) * 100
Knowing this, we just need to keep track of:
1) points scored/allowed by the team when the player is on the court and
2) number of possessions the player is part of.
Note that both of these items are unique to the player.
Don’t be like pop, count your numbers right.
Methodology
We created 3 classes to help our endeavors: Game, Team and Player.
Player instances will record the 2 items mentioned above.
Team instances will keep track of all players and the active players (on the court) and increment their points and possession count as appropriate.
Game instances ingests all the data needed for that one game and modifies its Team instances to reflect substitutions, points scored and more.
During initialization, a Game instance instantiates 2 Team instances, which each hold 15 Player instances.
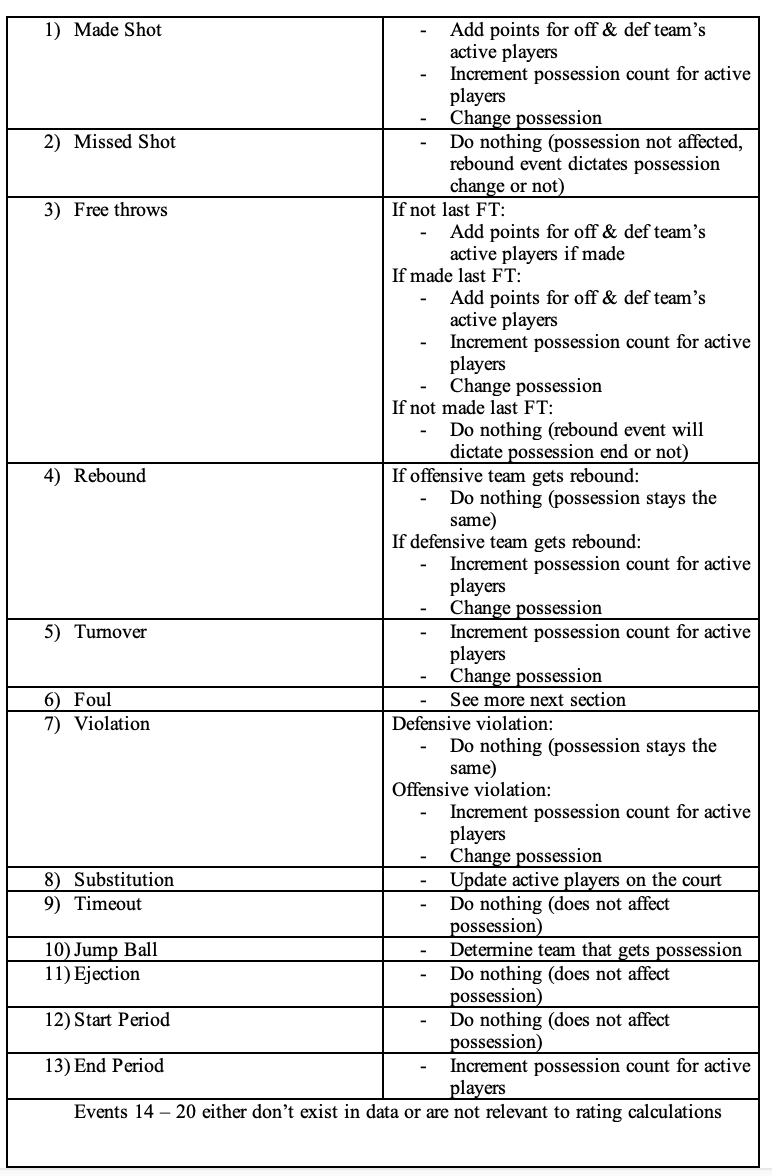
Event Handling
There existed many events in the Event_Codes data given to us. We used our basketball knowledge to determine which events would be relevant to our offensive and defensive rating calculations. Here is how we treated each event programmatically:
Some Minutiae: Substitution During Free Throws
It becomes slightly problematic when a substitution happens after a foul but before a free throw. This is because the NBA officially associates that free throw point to the active players on the court before the foul occurred. Logically, those 10 players were responsible for the foul happening, and not the players subbed in.
To accomodate this, we kept track of 2 lists of active players once a foul happened. After a foul ends (last free throw finishes and shot clock continues), we would continue just keeping track of 1 list of active players.
active_1 represented the active players throughout the game except when free throws were happening. If free throws were happening, active_1 would list the players on the court before any substitutions happen and active_2 would list the players on the court factoring in the substitutions (if there were substitutions). Anytime free throws ended, active_2 would be moved into active_1 and active_2 would be deleted. active_1 would continue to keep track of the active players on the court.
We would always add points / possessions to the players in active_1. However, there is one special case in which we do add points / possessions to the players in active_2 : when technical free throws happen in between free throws for another type of foul (normal foul, flagrant foul, clear path foul). In this case, we believe the technical foul arose directly due to the players on court, not the players on court at the time of the other foul. Hence, we would add technical free throw points to active_2 in this case.
Treating Fouls: Flagrant, Clear Path, Technical
We also understood that the definition of “a new possession” had major implications on our analysis. Here is how we handled the definitions possessions for fouls:
For Flagrant and Clear Path fouls, we counted the completion of their free throws as the end of a possession. The NBA Rulebook tells us that Flagrant and Clear Path fouls result in free throws and possession, so we counted completing their free throws as a separate possession.
For technical fouls, we did not count them as a separate possession. We believe that technical free throws are a result of unsportsmanlike conduct but should not affect the possession flow of the game. Hence, we would have the completion of technical free throws not count towards a possession.
Inconsistent Data for 3 Games
We found 3 games in the play-by-play data that had discrepancies with the other 79 games. There were no jump ball events for these 3 games at the start of the game or start of overtime.
This project was created for the Code Institute Halloween Hackathon in October 2021. The theme for this was ‘Spookathon’, where we were tasked with creating an interactive Halloween book or story. It is designed to be responsive on a wide range of devices, whilst also being easy to navigate through.
This project was created for the Code Institute Halloween Hackathon in October 2021. The theme for this was ‘Spookathon’. We were tasked with creating an interactive Halloween book or story. The brief stated that this project needs to depict a halloween story or fairy tale, it needs to be able to be interacted with in some way, and it should have animated elements. It is designed to be responsive on a wide range of devices, whilst also being easy to navigate through. We wanted this site to be accessible to users of all ages, and we wanted to be fully inclusive of gender choices.
모델을 기반으로 코드가 자동으로 만들어지는 (Auto-generation Code) 개발 방식
전통적인 C/C++과 같은 언어로 프로그램을 짜는 방법과 다름.
각 기능에 맞는 모델을 선택하여, 설계하고, 시뮬레이션을 통해 결과를 확인하면서, 예상과 다른 결과라면 모델을 다시 그려서 결과를 확인하는 과정을 반복 => 모든 과정은 PC에서 이루어지며, 실제 시스템에 연결하기전 예상 가능한 오류를 발견하고 수정하는 것이 매우 빠르게 진행된다!
이점
시스템 개발의 모든 단계에서 시험과 검증을 연속적으로 수행하여 중복 구현 비용을 절감할 수 있음.
모델링과 시뮬레이션 단계에서 시스템 알고리즘에 대한 시험을 수행 가능함.
이미 설계된 기능 모델을 활용 할 수 있음.
구현(Implemenatation) 단계에 필요한 비용을 줄일 수 있음.
MBD 개발 워크플로우 (V-Model)
graph TD
  A[시스템 요구사항] --> B[모델 설계]
  B --> C[MIL 검증]
  C -->|요구사항 추적| D[구조적 커버리지]
  D --> E{SIL/PIL 검증<br/>MC/DC ≥95%?}
  E -->|Yes| F[HIL 통합]
  E -->|No| B
  F --> G[배포]
  G -->|결함 분석| H[요구사항 개정]
  H --> A

  style D fill:#f0f0f0,stroke-dasharray: 5 5
  style E stroke:#ff0000,stroke-width:2px
Loading
활용
자동차의 ECU 개발을 중심으로 모델 기반 설계라는 개념이 제창되었고, 많은 제어기가 MBD 기반의 SW 개발로 확장되고 있음.
MBD와 ISO26262 관계
자동차 기능 안전 국제 표준인 ISO26262의 Part 6 “소프트웨어 수준에서 제품 개발”은 MBD 분야의 검증을 언급하고 있음. 반면 MBD의 동적 검증은 코드나 모델 구분 없이 단위/통합 단계에서 요구사항 기반 인터페이스 검증을 수행하도록 권고하고 있음.
모델 정적 검증이란?
MISRA, MAAB, dSPACE 등의 모델링 가이드라인(규칙)을 기준으로 가이드라인에 위배되는 항목을 검출하는 것
정적 검증은 모델의 가독성 및 유지 보수성을 향상시킴과 동시에 가이드라인을 적용하여 잠재된 결함을 발견함으로써 소프트웨어의 품질을 높이는 작업
모델 동적 검증이란?
MBD 방식으로 개발된 모델에 대해서도 단위/통합 검증을 수행함. 수행 절차는 테스트 준비, 테스트 실행, 결과 확인의 절차를 통해 이루어지며 준비된 시험 자료를 모델에 입력하고 원하는 출력이 나오는지 확인함.
모형화 단계에서 모델의 동작을 확인함으로써 SW 수행 중 발생 가능한 오류를 미리 감지할 수 있다는 장점이 있음.
Run the following: ./fastaCG.sh https://ftp.ensembl.org/pub/current_fasta/sus_scrofa/dna/Sus_scrofa.Sscrofa11.1.dna.primary_assembly.Y.fa.gz
Select ‘y’ to overwrite existing fasta.fa file in project directory
Outputs:
SEQUENCE NAME: Y dna:primary_assembly primary_assembly:Sscrofa11.1:Y:1:43547828:1 REF:
CG PERCENTAGE: 43.21%
TOTAL FASTA LENGTH: 43547828 bases
TIME: 0.67s
CG percentage output at 43.21%
How it works
When the executable ./fastaCG.sh is run with a <URL-to-.fa.gz-file> from the command line, the link is downloaded using wget, renamed to ‘fasta.fa.gz’, and then gunzipped to leave the file ‘fasta.fa’.
This fasta.fa file is then passed on to scriptfastaCGv2.py, where the bases for the sequence(s) are counted to give a CG percentage using Biopython’s SeqIO.
The output of scriptfastaCGv2.py gives the name of the sequence(s) from the FASTA file, followed by the CG percentage of that sequence, the total FASTA file base length, and the time taken for the .py script to run.
Version History
v1 – completed December 2024
Manual parsing of FASTA file using string methods.
Separately counts each base as strings ‘A’, ‘T’, ‘C’, ‘G’ in lists.
Manually constructs sequence headers and splits on ‘>’.
Ignored lowercase bases, occasionally leading to inaccurate percentages.
v2 – completed June 2025
Uses Biopython’s SeqIO to parse FASTA for more biologically reliable and accurate parsing.
Simplifies base counting logic to directly calculate CG percentage.
Handles upper- and lower-case bases (e.g G and g) to include all bases in FASTA file.
Includes time taken and total base count for the FASTA file.
The Web App must be hosted somewhere. Hosting it on a GitHub repository is a quick, free way to do it:
Create a repository (or fork this one)
On the repository: Settings –> Pages:
Source: Deploy from a branch
Branch: master, / (root), Save
Wait a few minutes for the web to be deployed. It will be available at: https://{github-username}.github.io/{repository-name}/{location-inside-repository}. In this case: https://revenkroz.github.io/telegram-web-app-bot-example/index.html
1. Show the user a button to open a Web App. There are two ways:
Show the user a special menu button (near the message input field):
To connect a Web App to the Telegram client, place the script telegram-web-app.js in the <head> tag before any other scripts, using this code (more info):


